102. UTM tracking using GTM
UTM tracking using GTM
- Basic UTM tracker setup in Google GTM
- Creating Variables in GTM for UTM Tracking
- Track UTMs in Google Analytics using GTM
- Trigger an Event (Conversion) in Google Analytics (GA) on Thank You Page
- Trigger an Event (Conversion) in Google Analytics (GA) based on Custom Event
- Send form data with UTMs to a webhook (e.g. Zapier)
- Trigger Custom Code (Javascript) After UTMSimple Loaded
- Track UTMs in GA4 using GTM
Basic UTM tracker setup in Google GTM
Donwload our Template
Click here to download UTMSimple GTM template.
Import the template to your GTM container
Go to Templates and click New
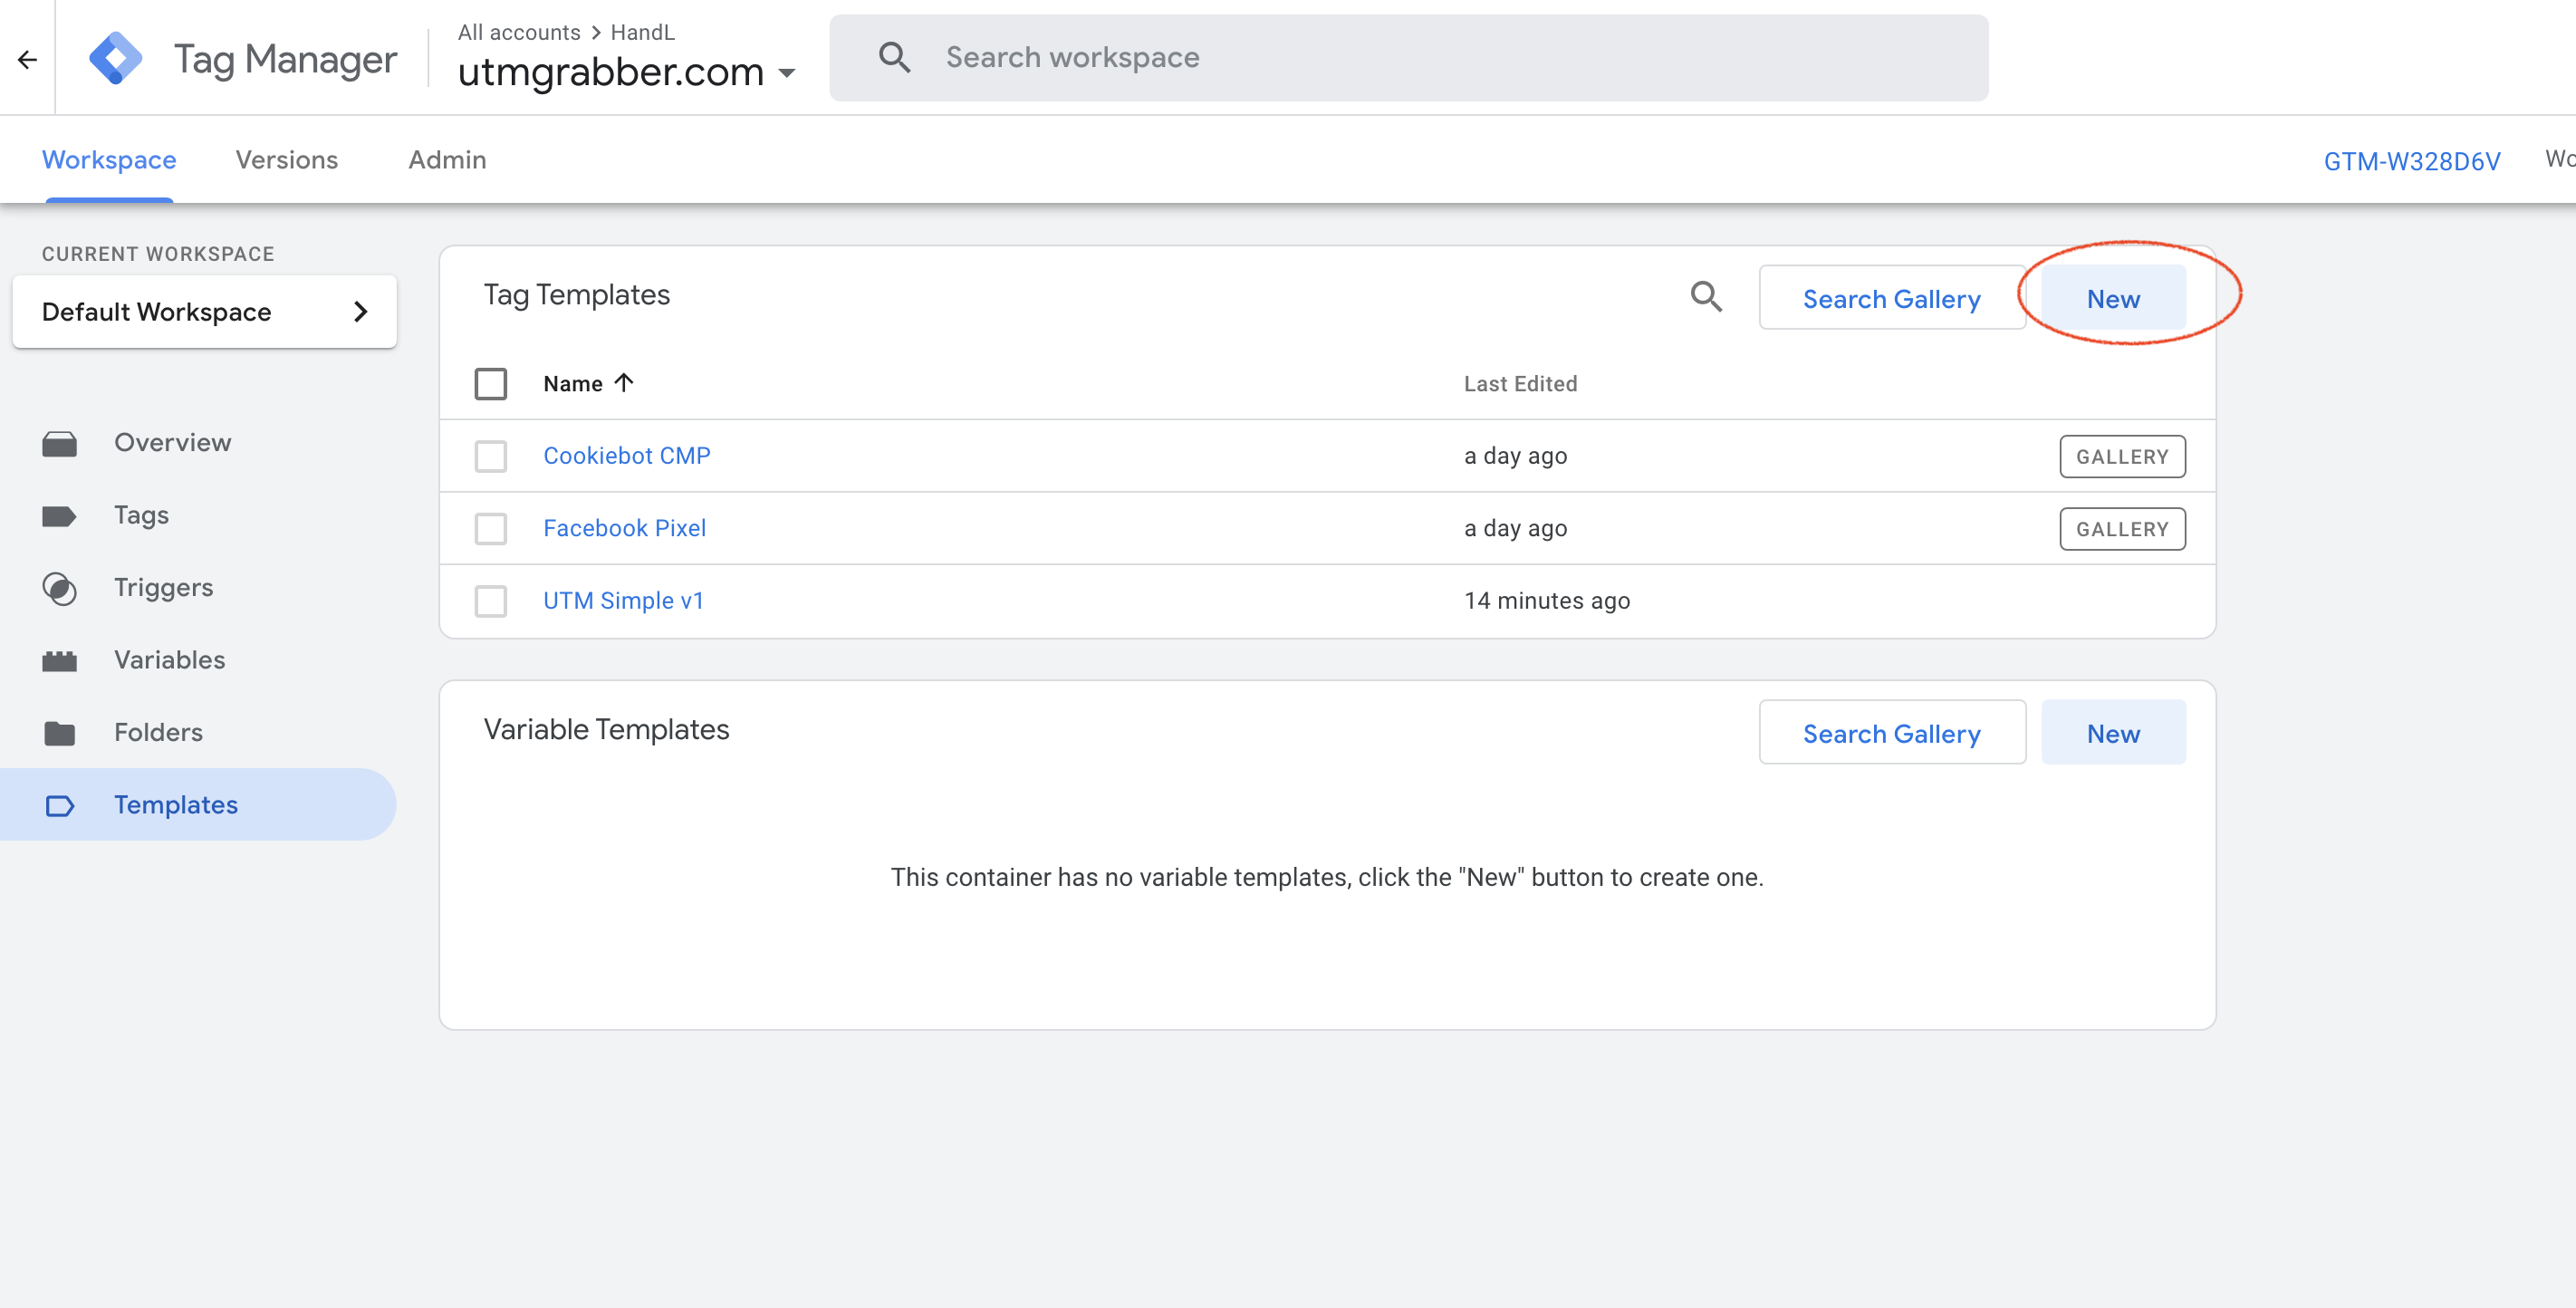
And click Import
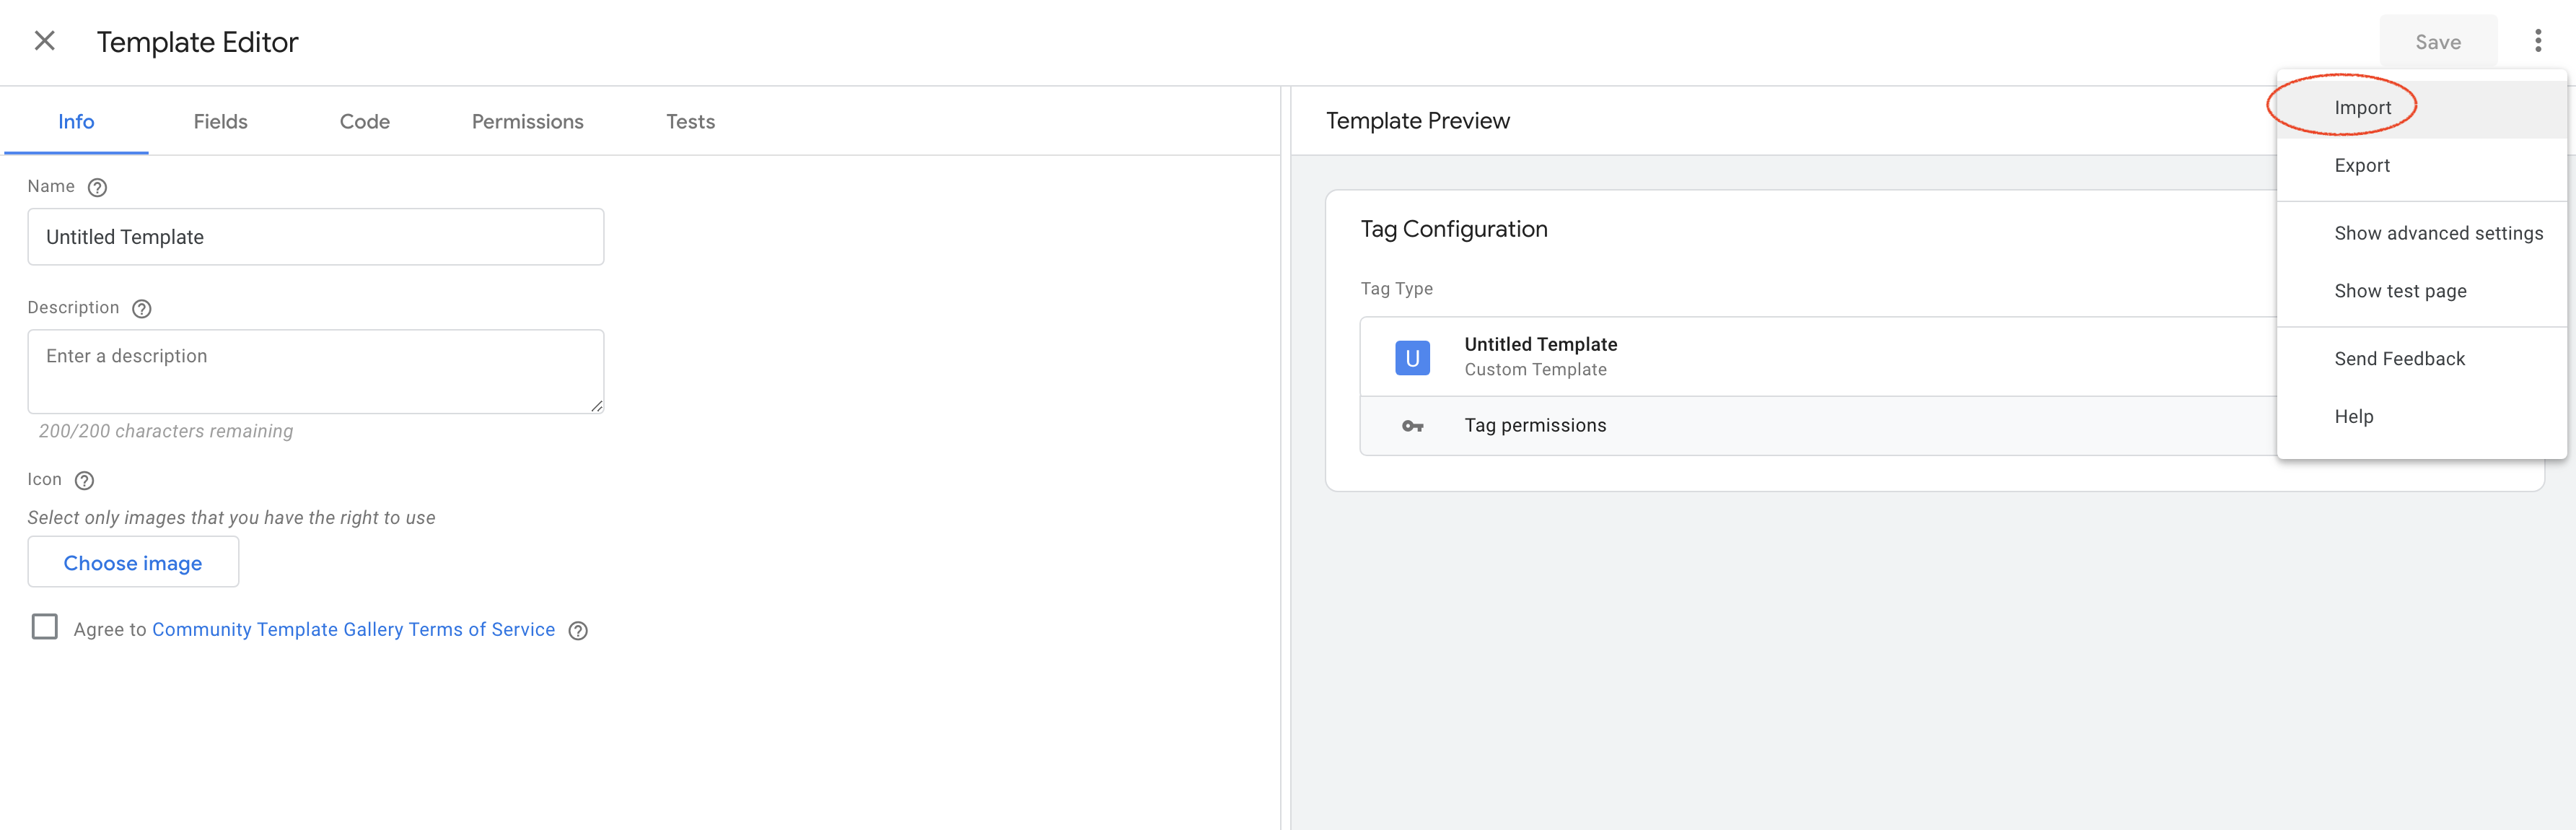
Select the template.tpl file you just downloaded and upload it. You should see something similar to below.
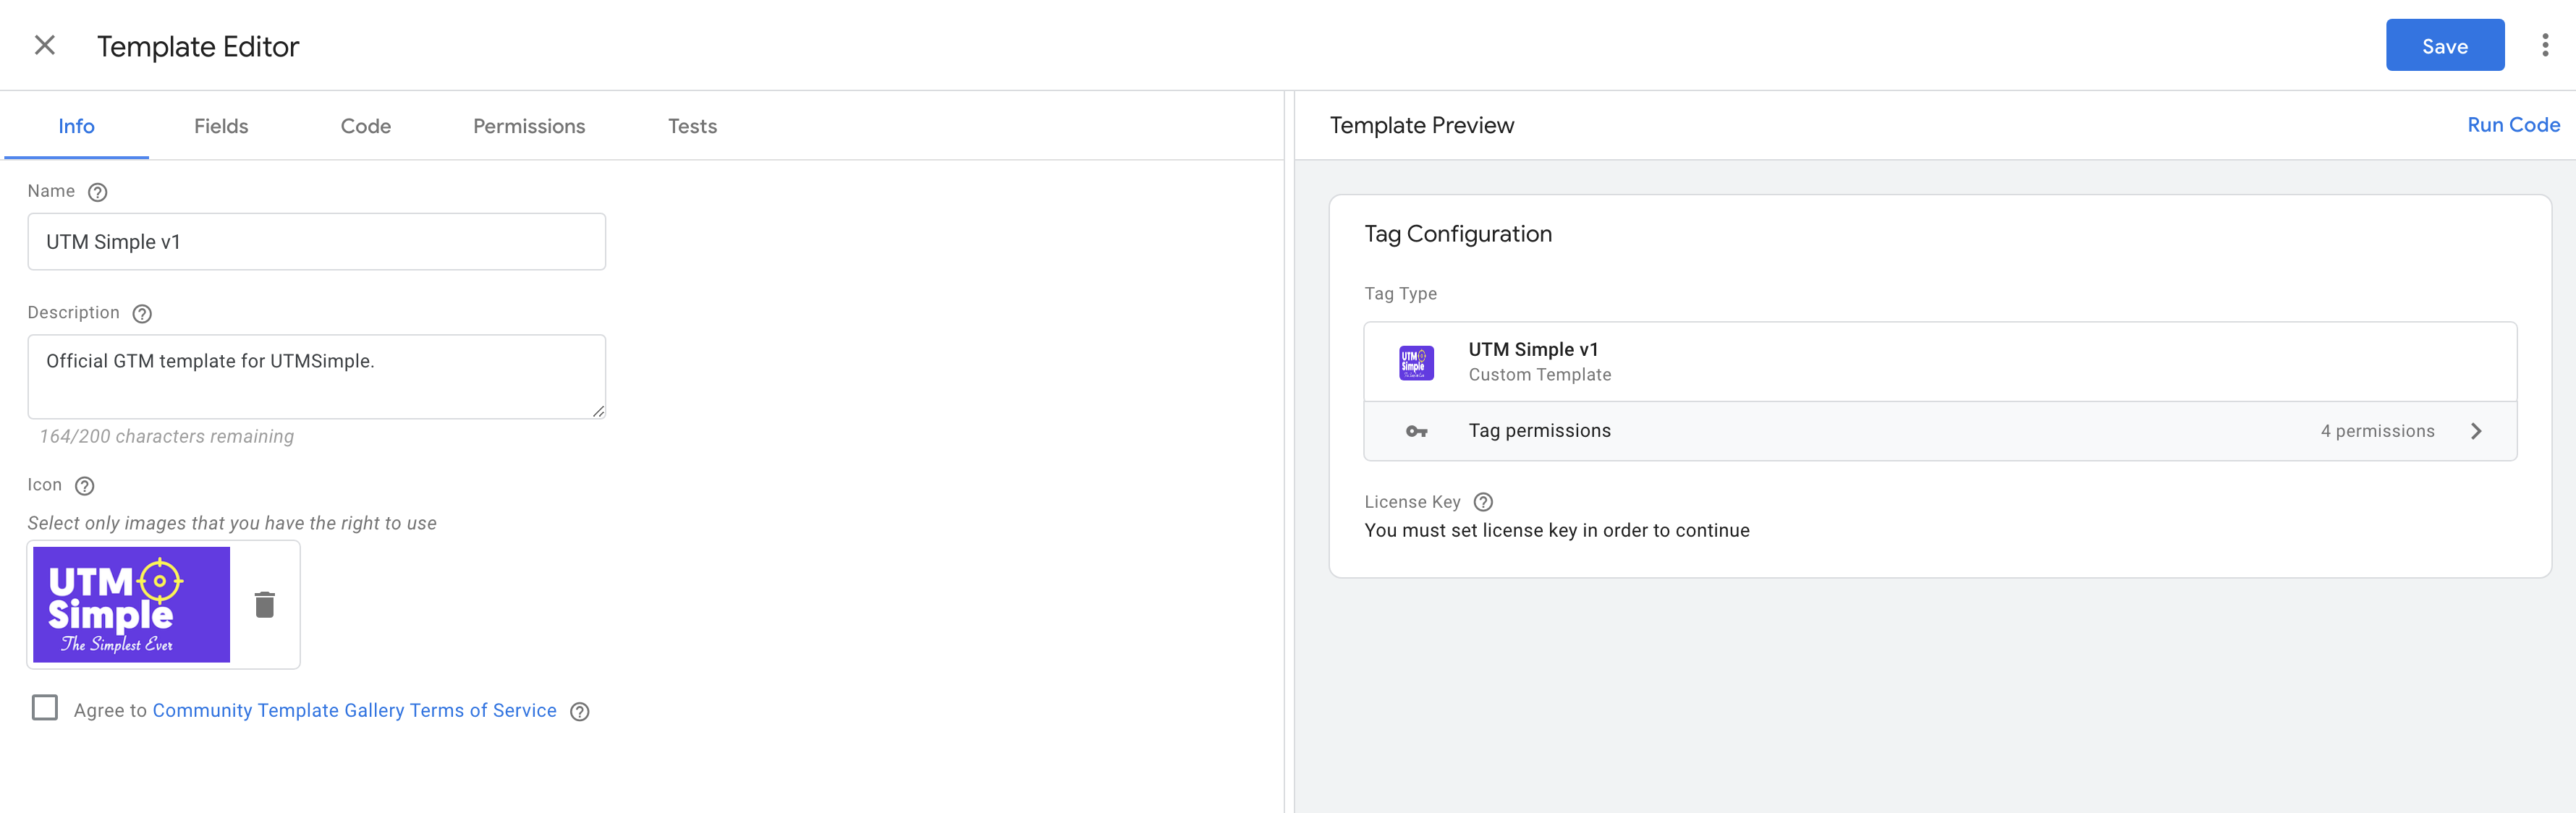
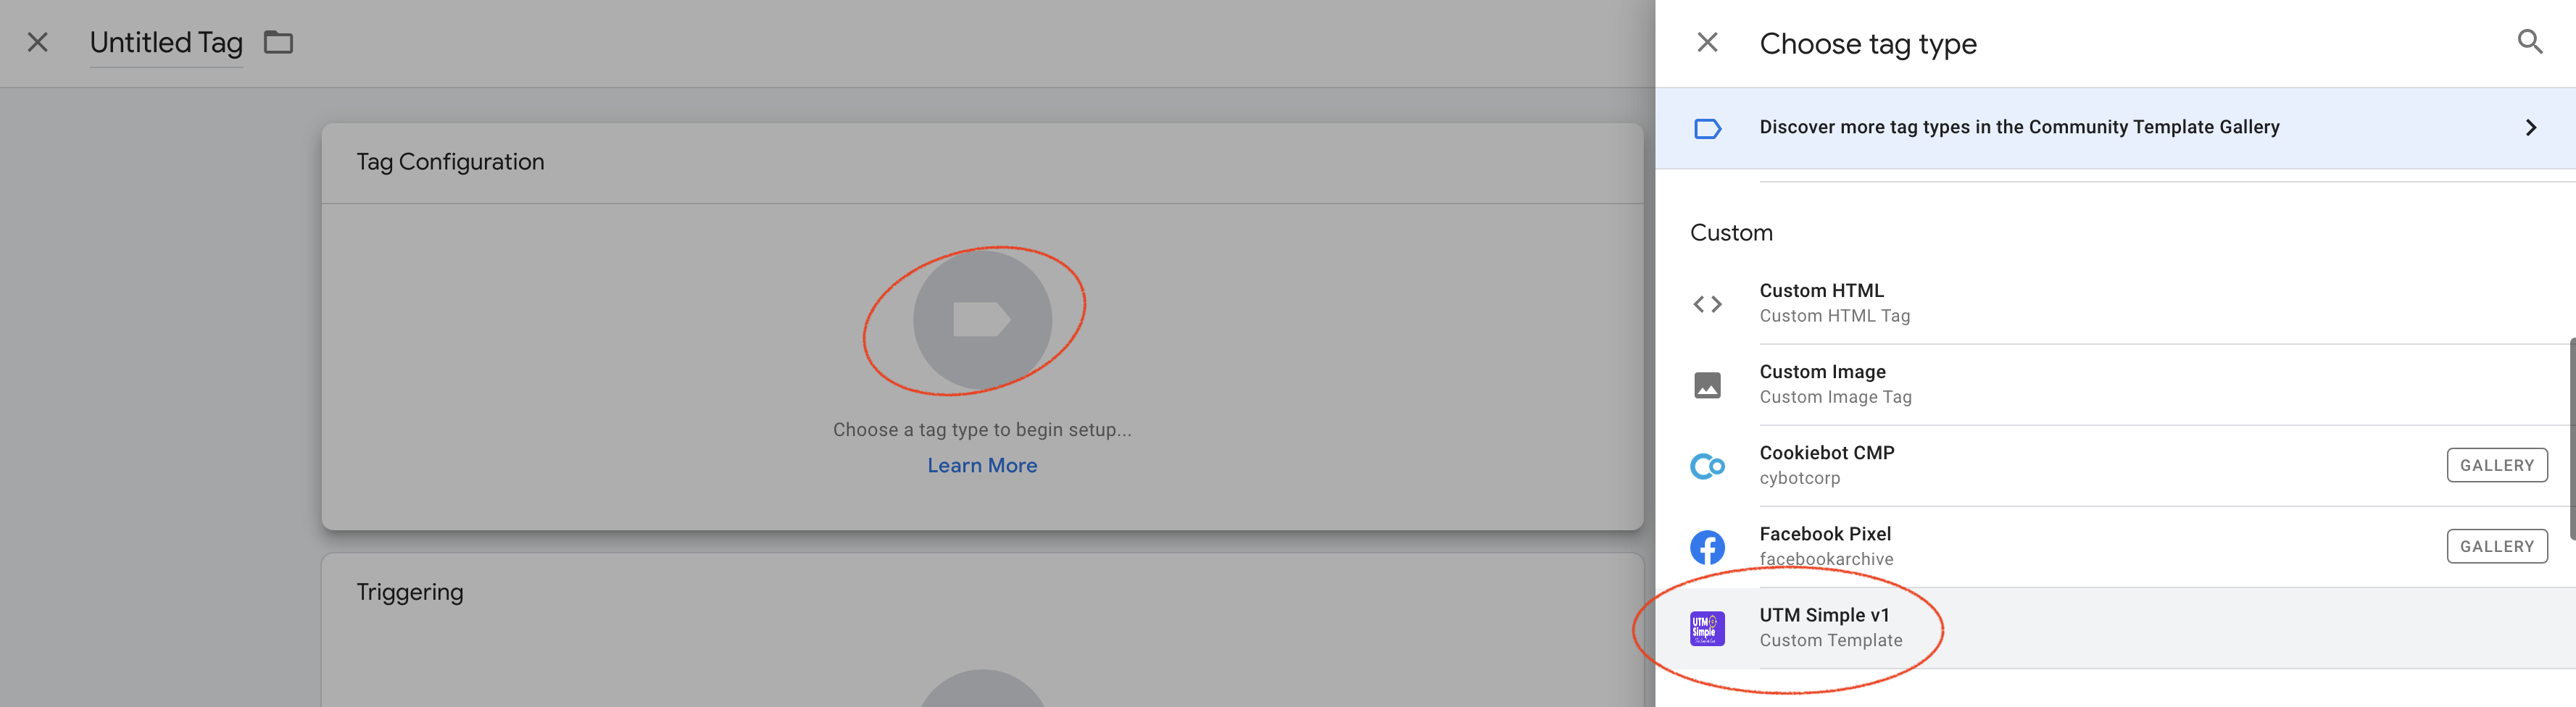
Add the template to Tags
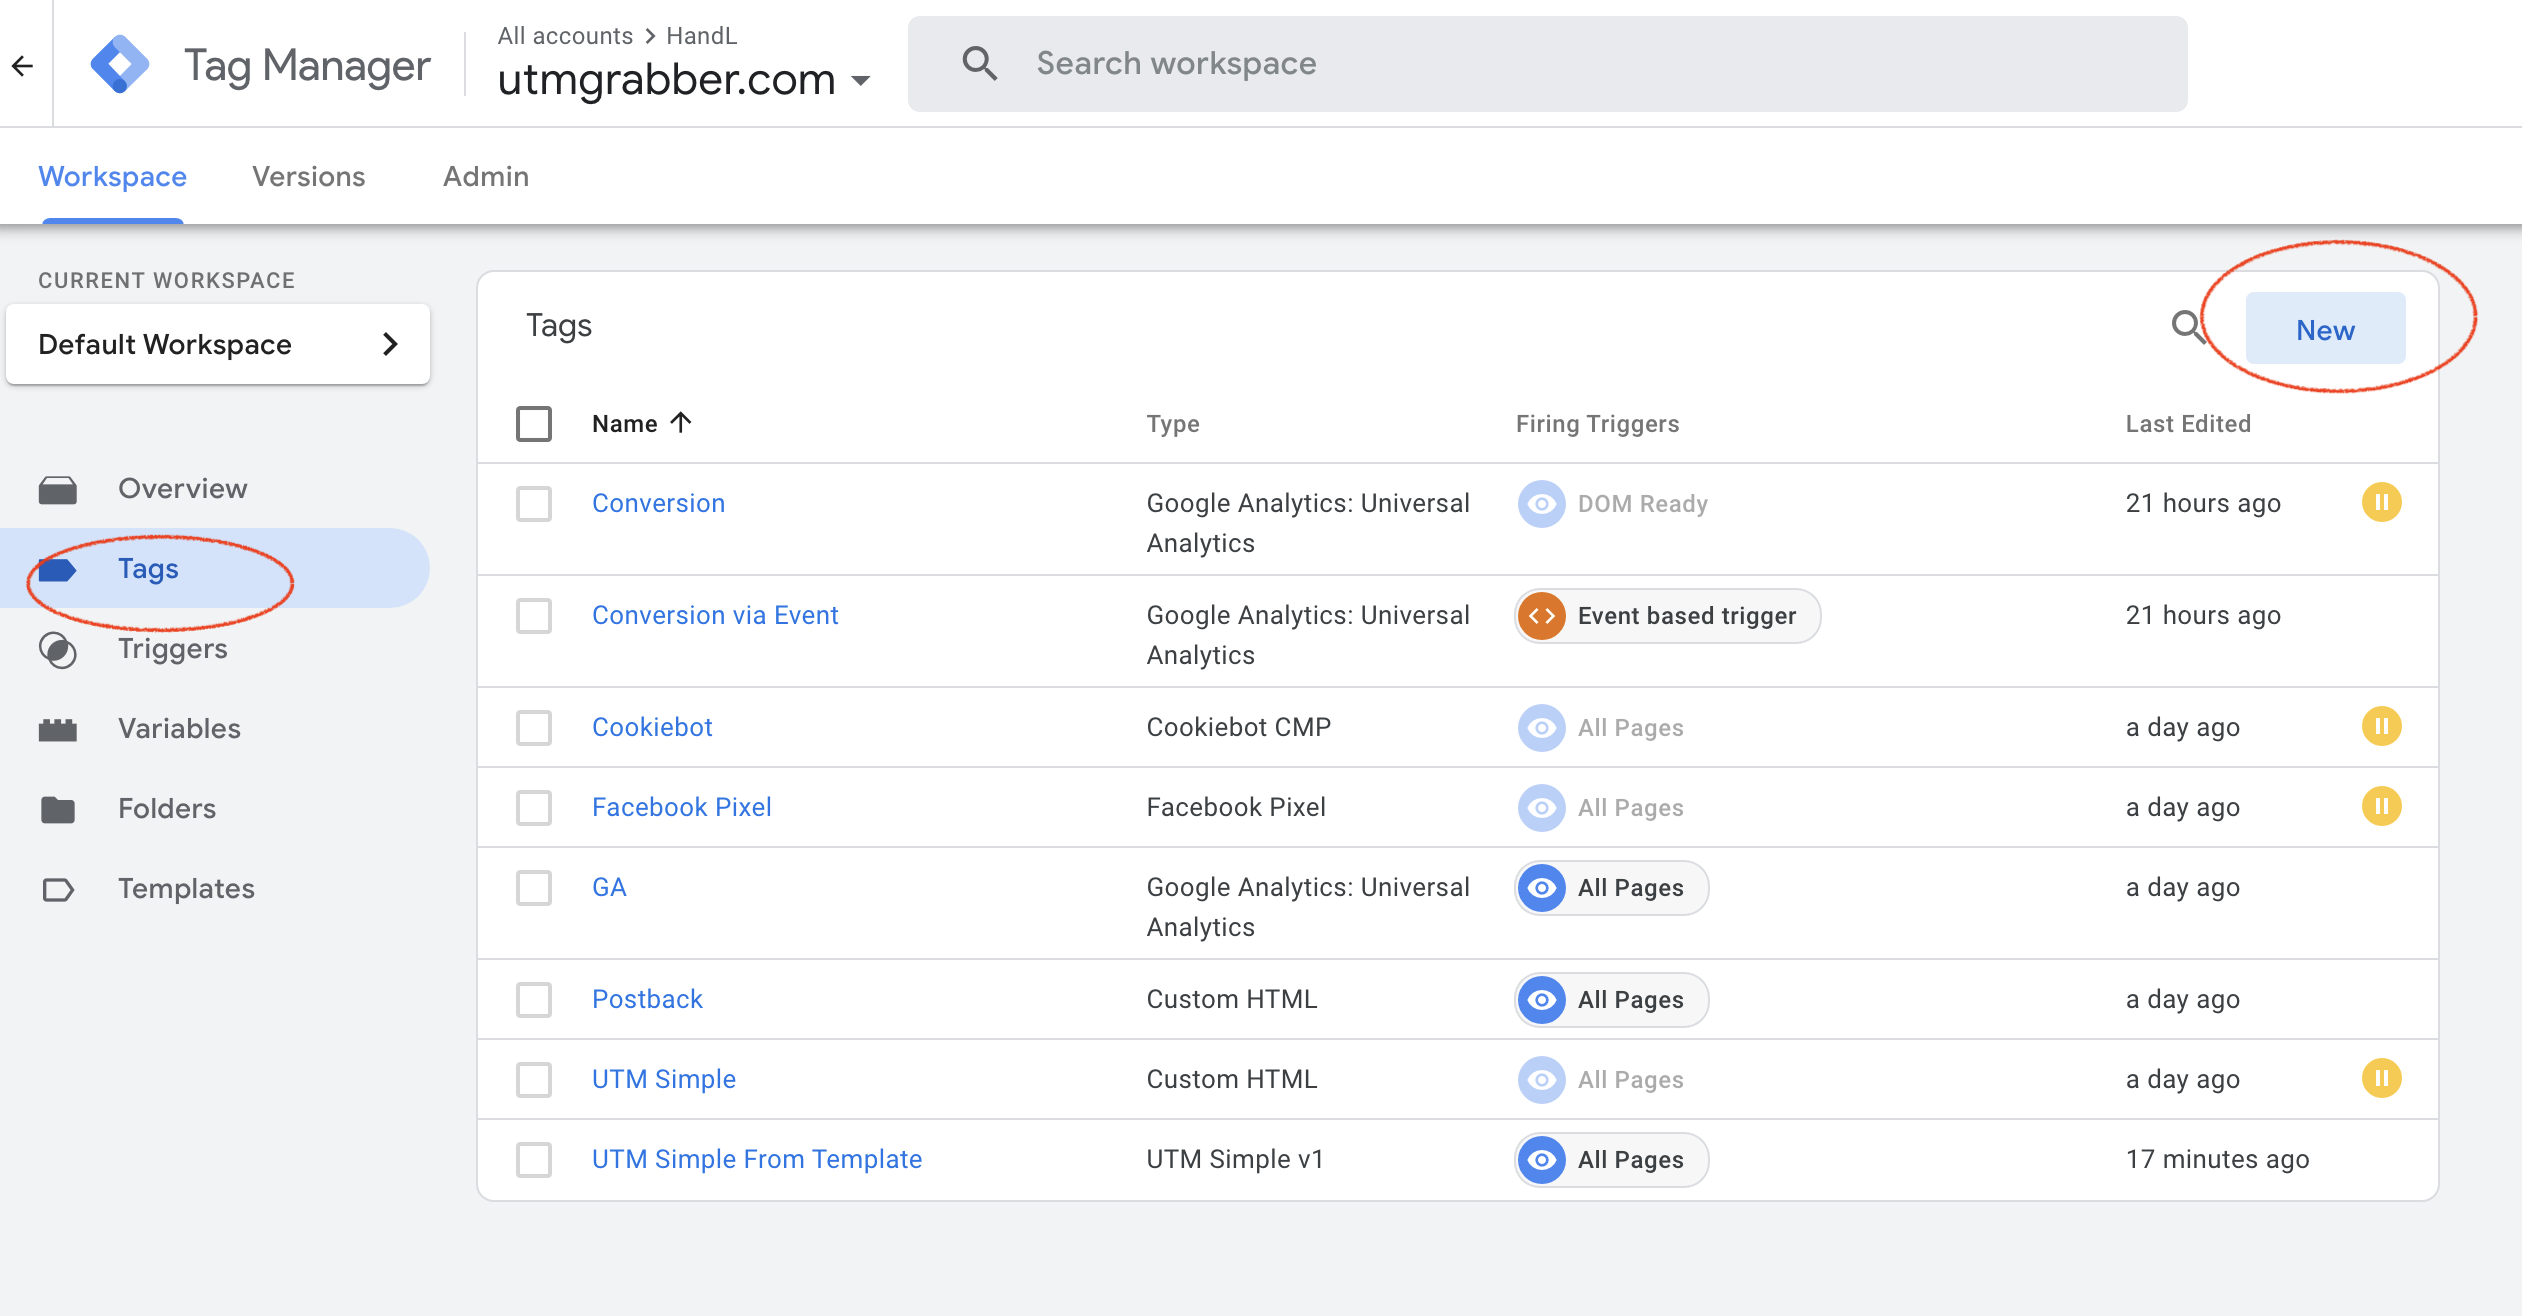
Click tag configuration and select UTM Simple template
Enter your license key
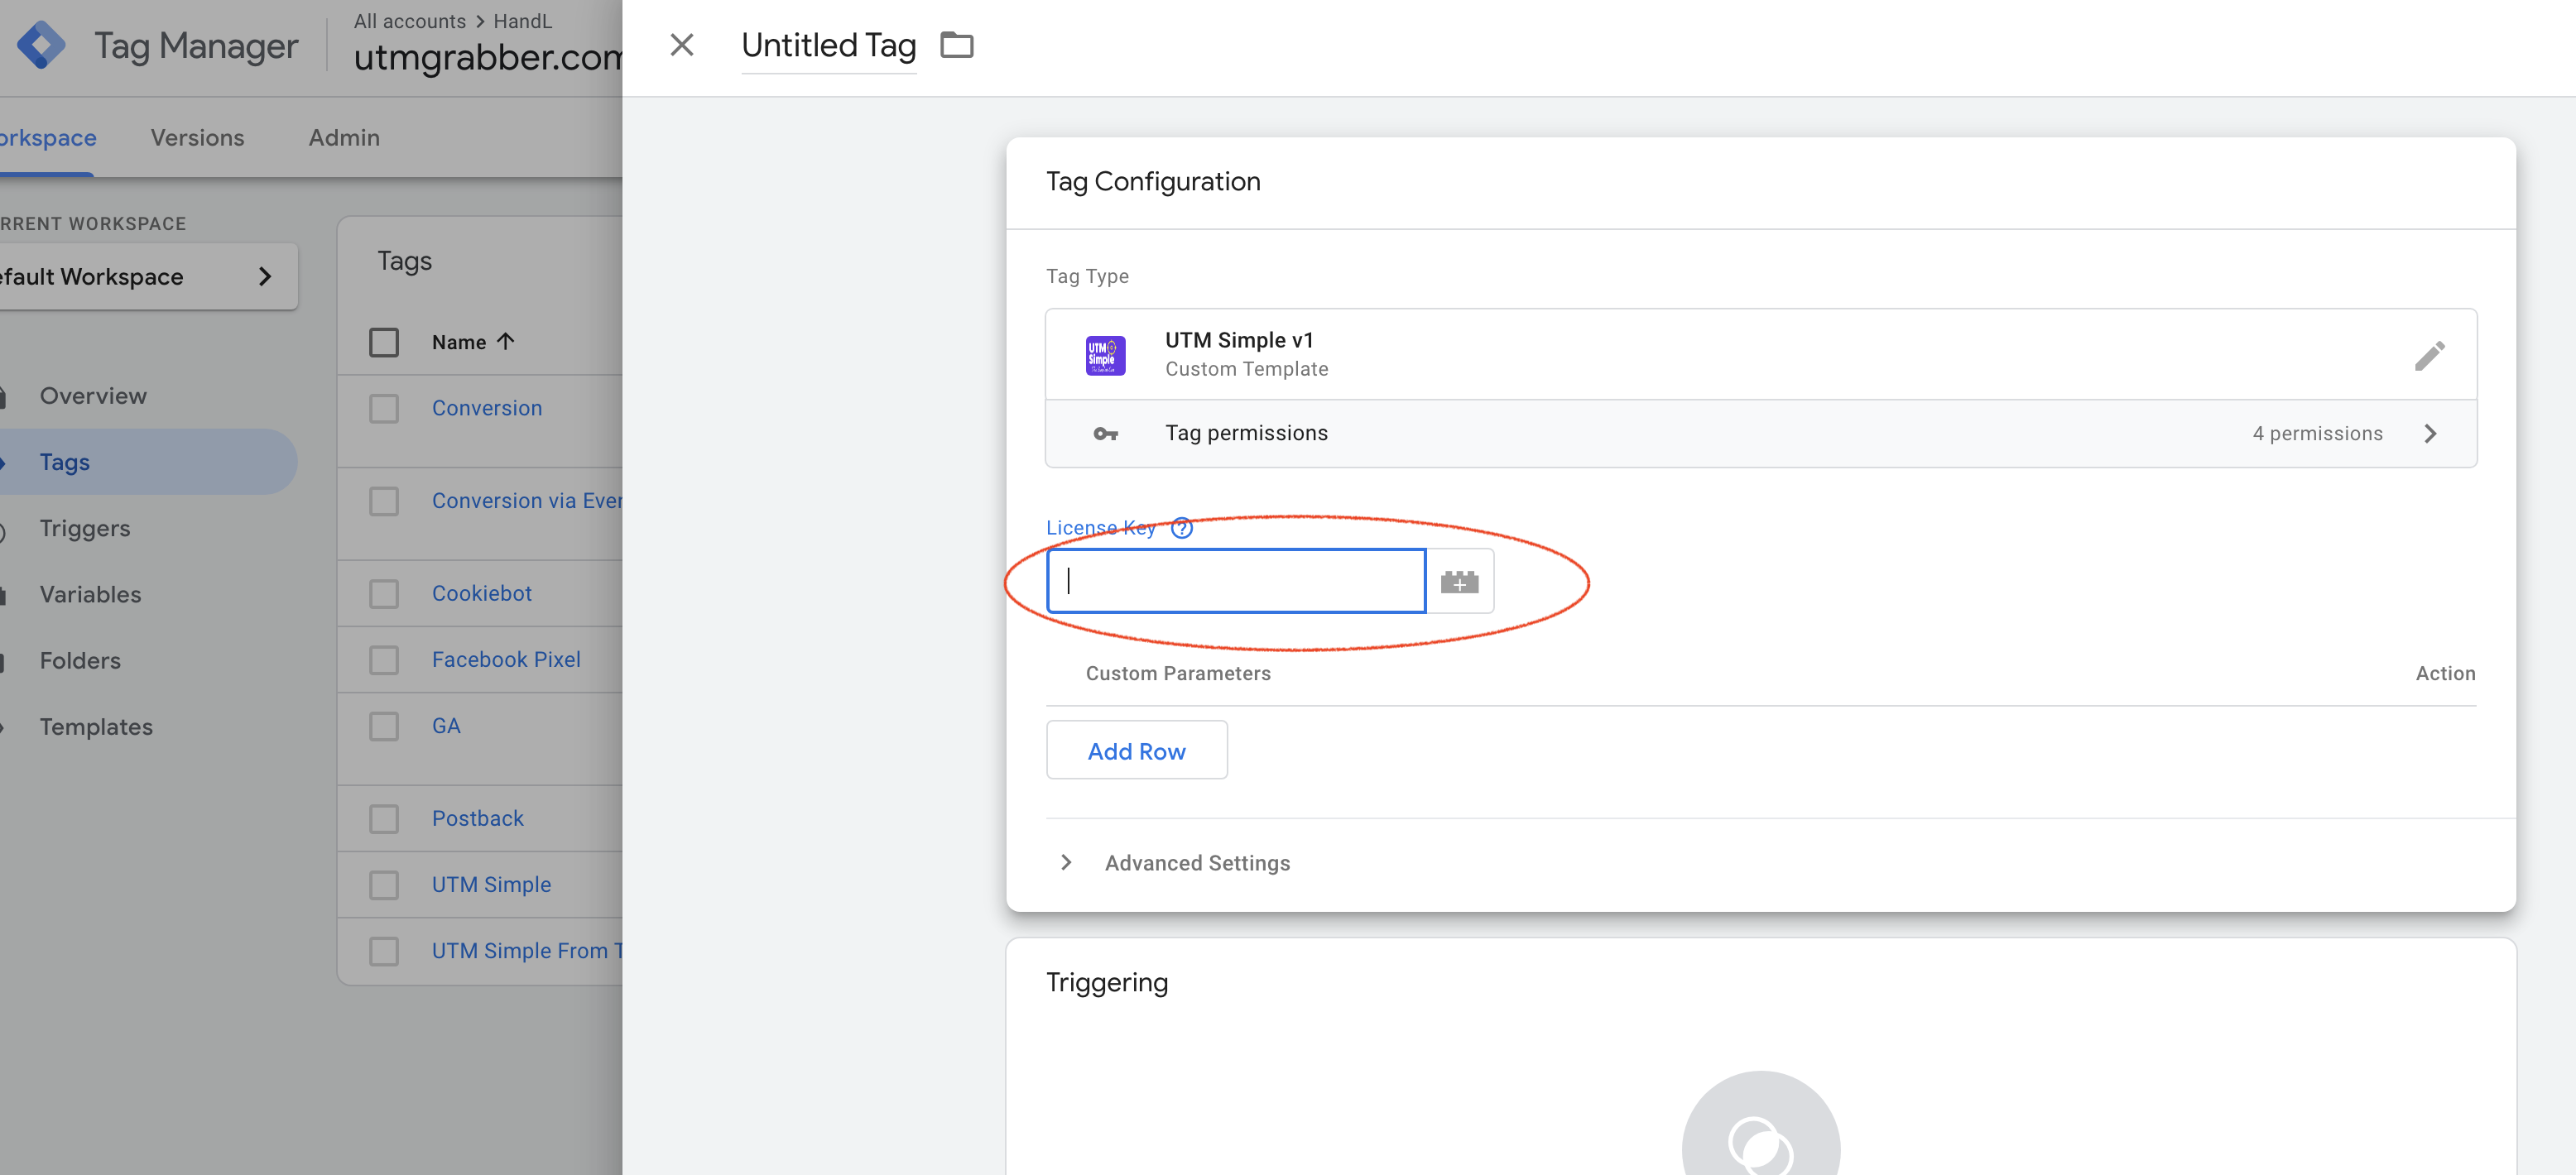
You are ready to rock and roll!
Creating Variables in GTM for UTM Tracking
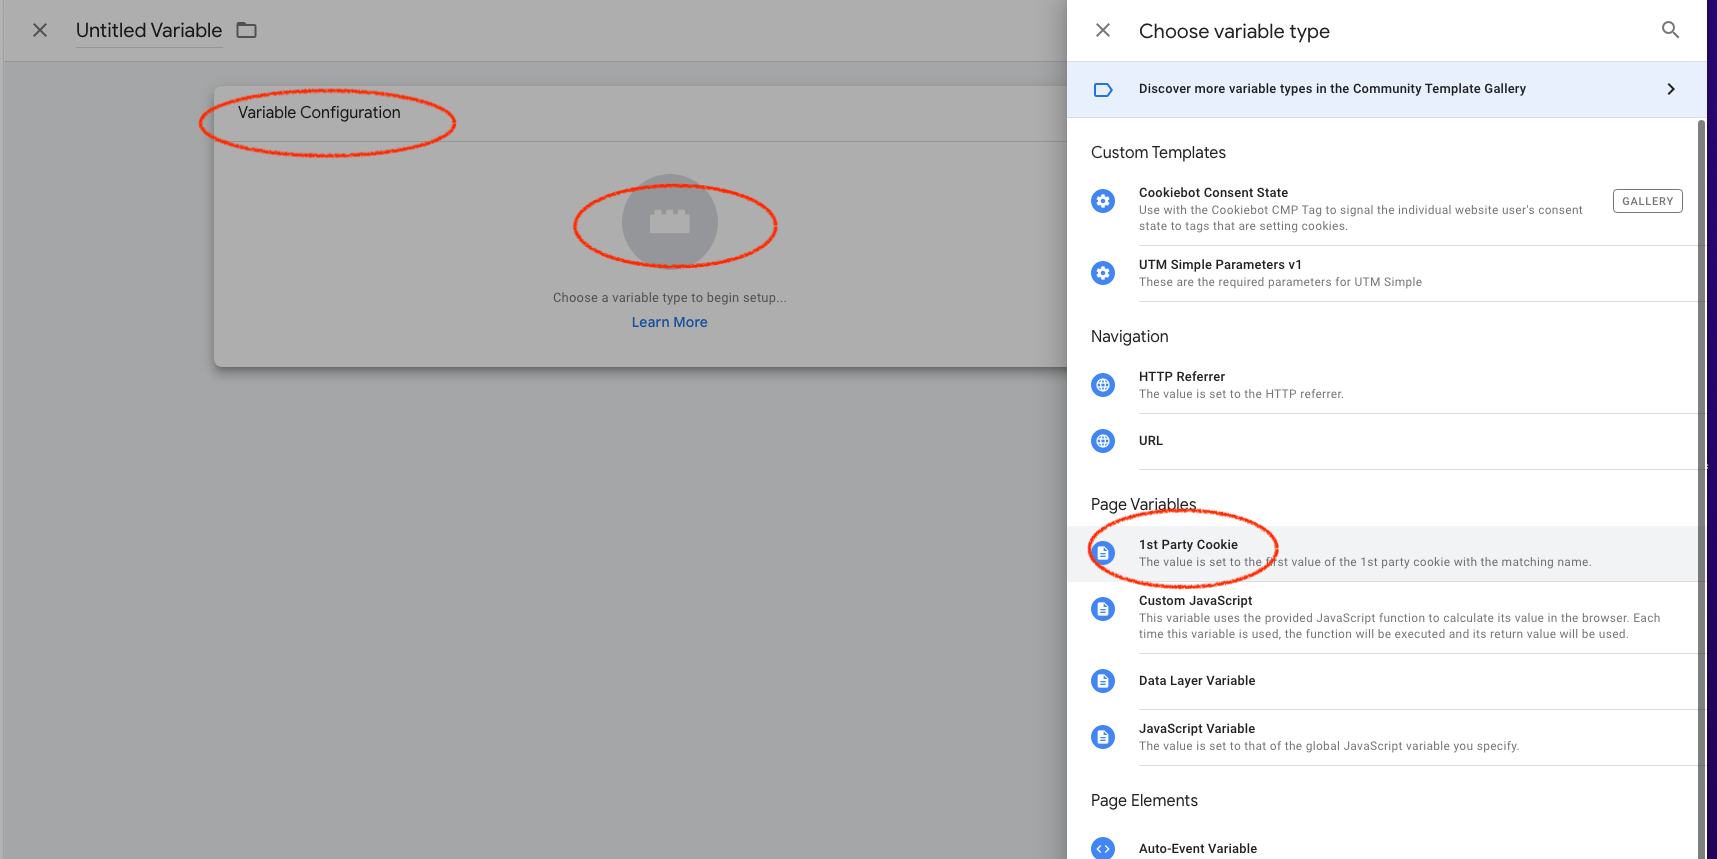
Creating the variables
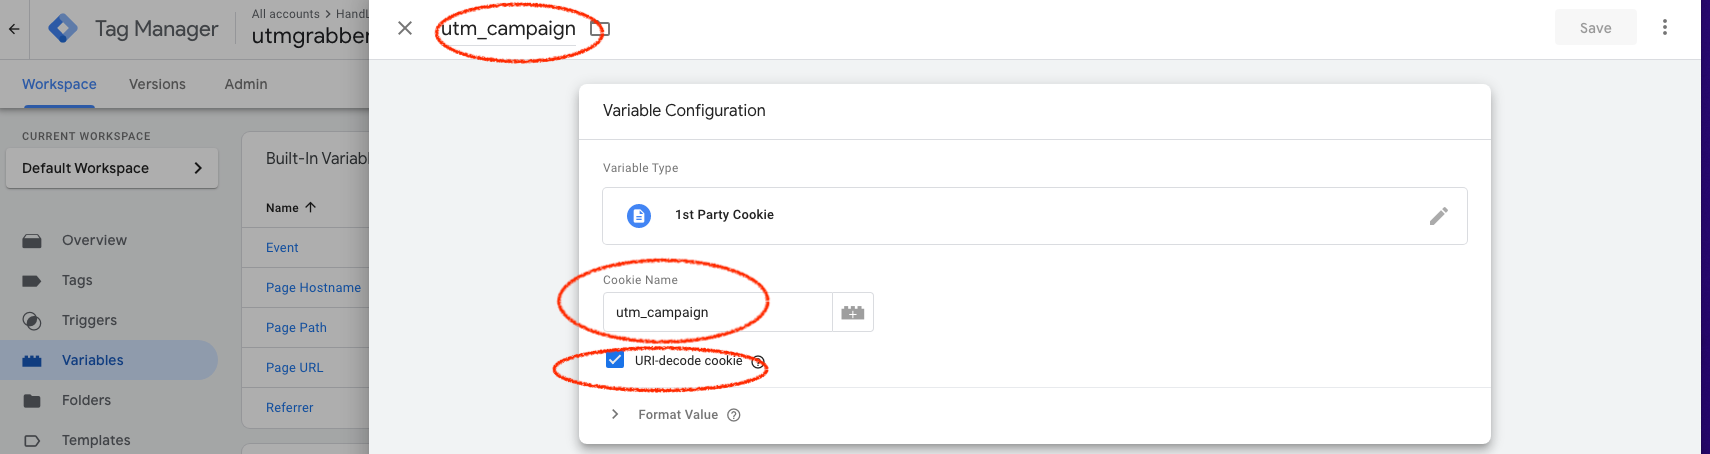
Login to your GTM and click "Variables" and "New". Then select, "Choose Variable" and select "1st Party Cookie" as shown in the image.
Enter utm_campaign as cookie name and check "URI-encoded cookie"
Repeat this for any parameters you'd like to track for. See here for the full list What can I track with UTMSimple?
Track UTMs in Google Analytics using GTM
Before you continue make sure you
you set it up UTM Simple template in GTM Basic UTM tracker setup in Google GTM
And also you created variables Creating Variables in GTM for UTM Tracking
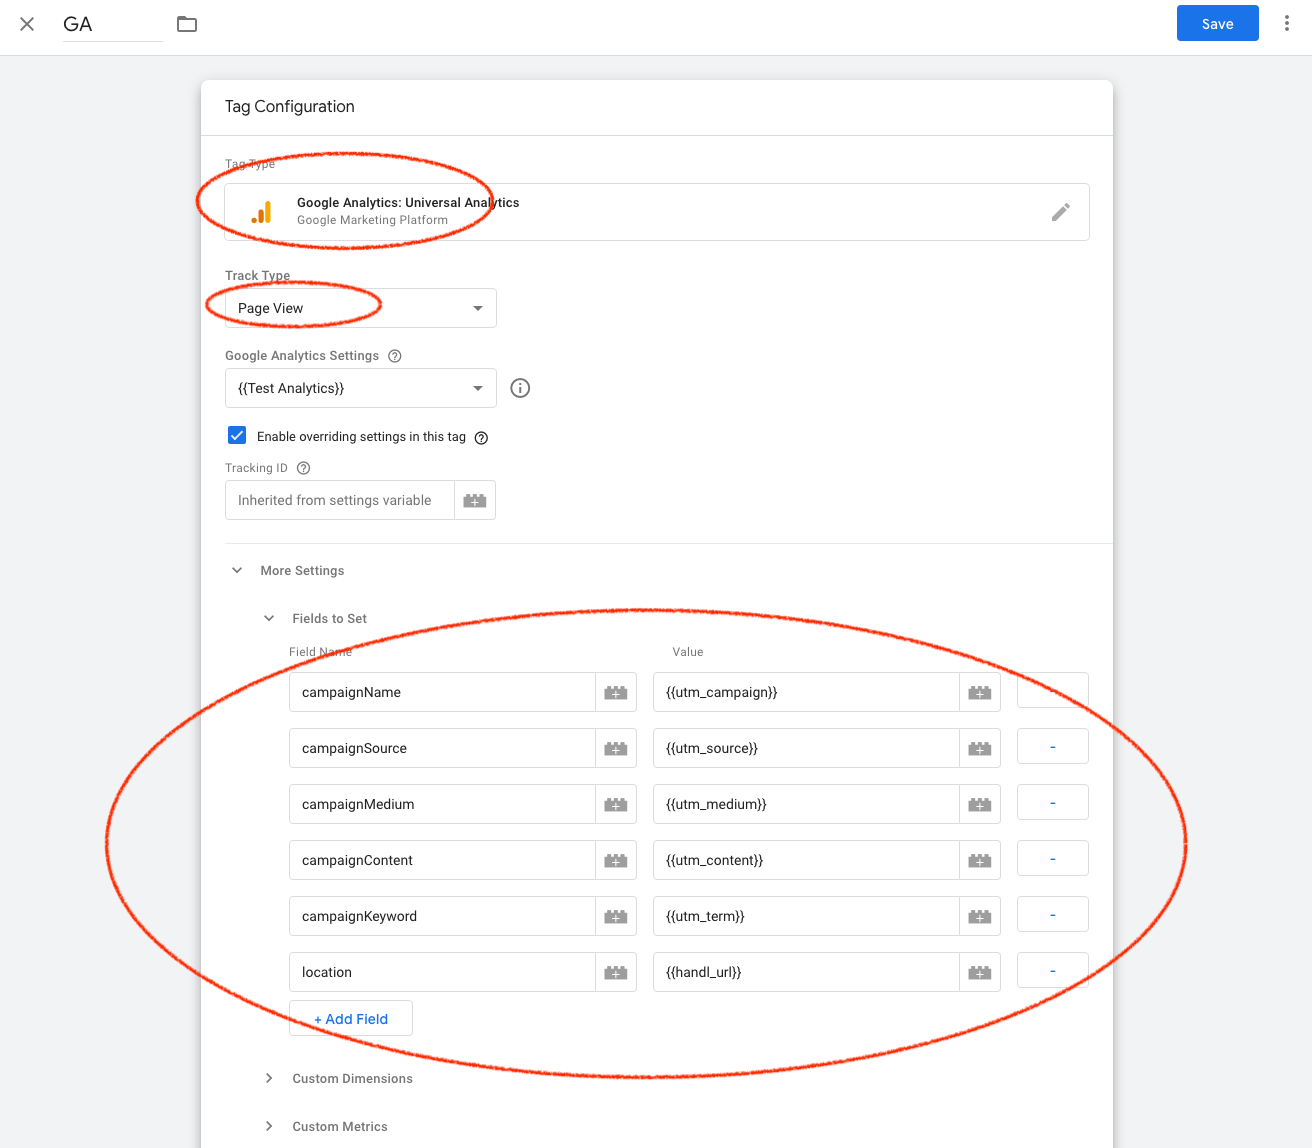
Add Google Analytics (GA) tag and set it up
After you add the Google Analytics tag, click "Enable overriding settings in this tag"
Select "More Settings" and "Fields to set"
And enter the following
Field Name: campaignName and Value: {{utm_campaign}}
Field Name: campaignSource and Value: {{utm_source}}
Field Name: campaignMedium and Value: {{utm_medium}}
Field Name: campaignContent and Value: {{utm_content}}
Field Name: campaignKeyword and Value: {{utm_term}}
Field Name: location and Value: {{handl_url}}
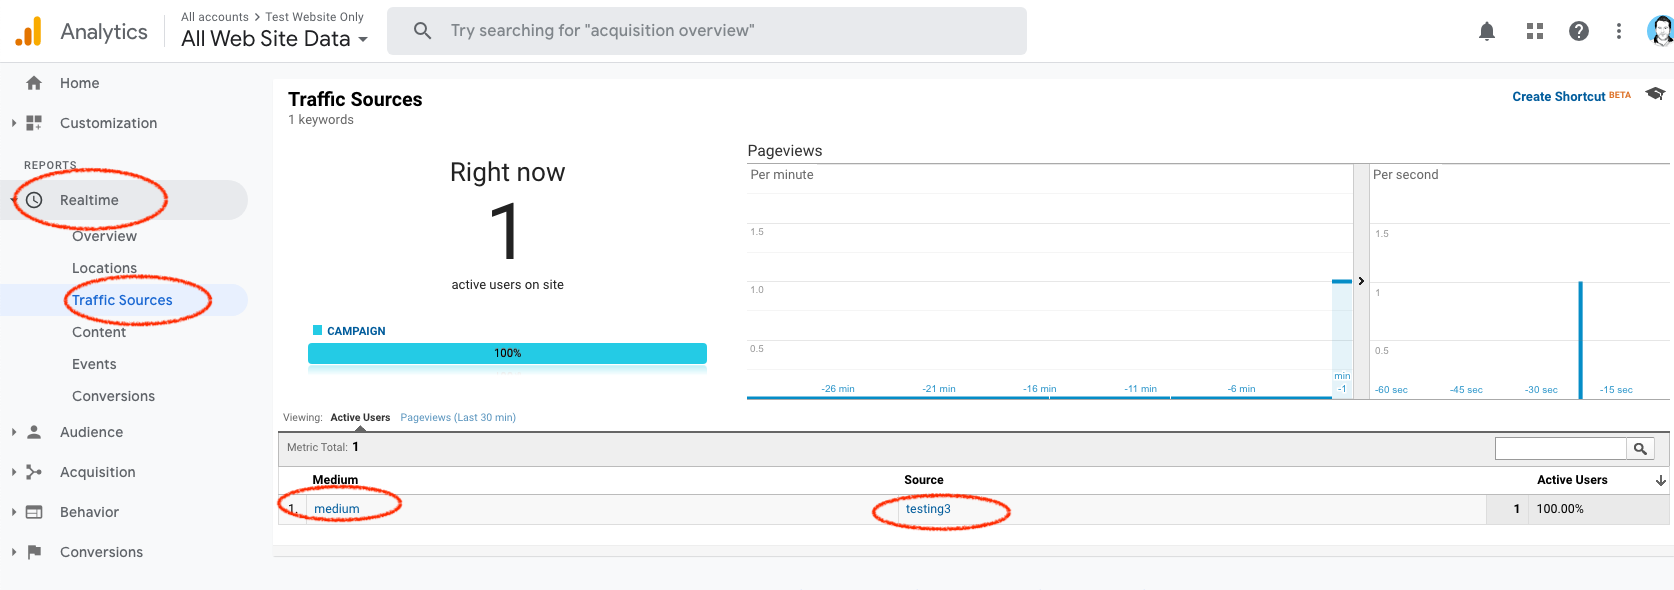
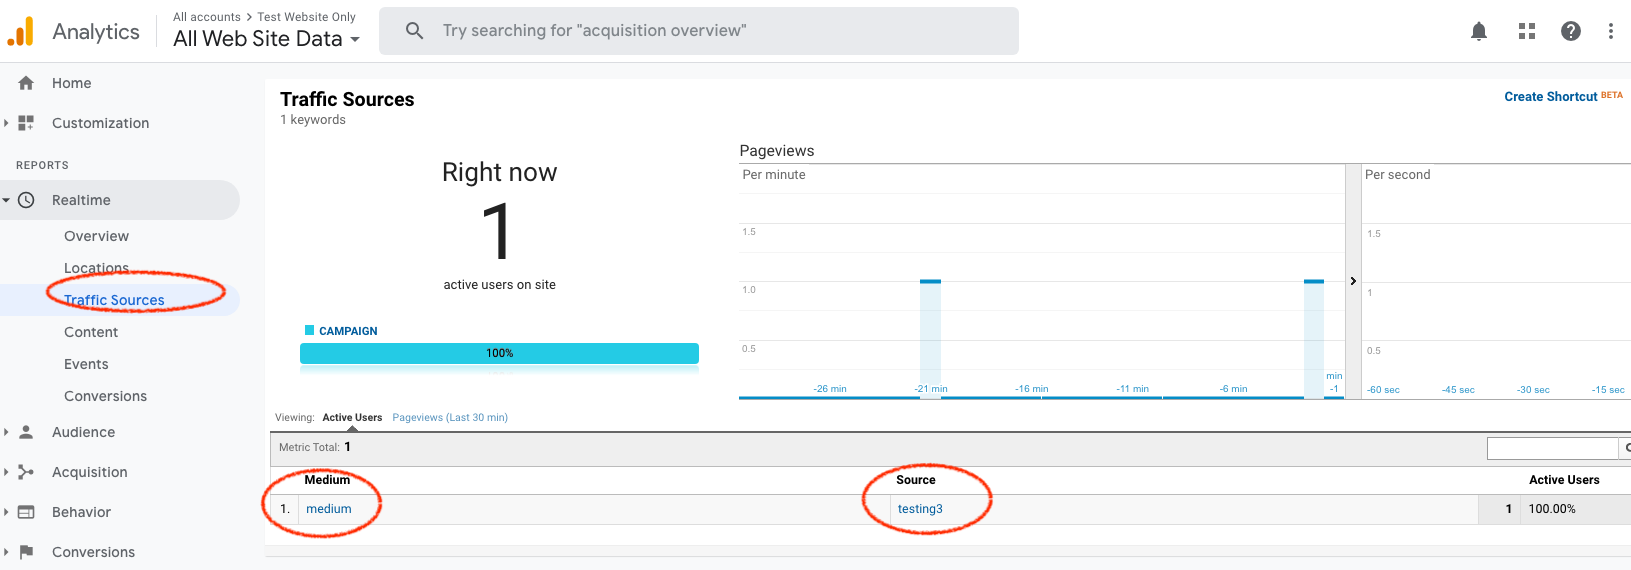
After deployig the new container, refresh your site (make sure UTMs are appended to the URL) and confirm in realtime GA. Your traffic should be tagged with proper UTM under "Traffic Sourcecs"
Trigger an Event (Conversion) in Google Analytics (GA) on Thank You Page
Set up your Tag
First step is setting up your Event in Tag. Configure your event as it fits your need. You can see our example below. We highligted the important fields.
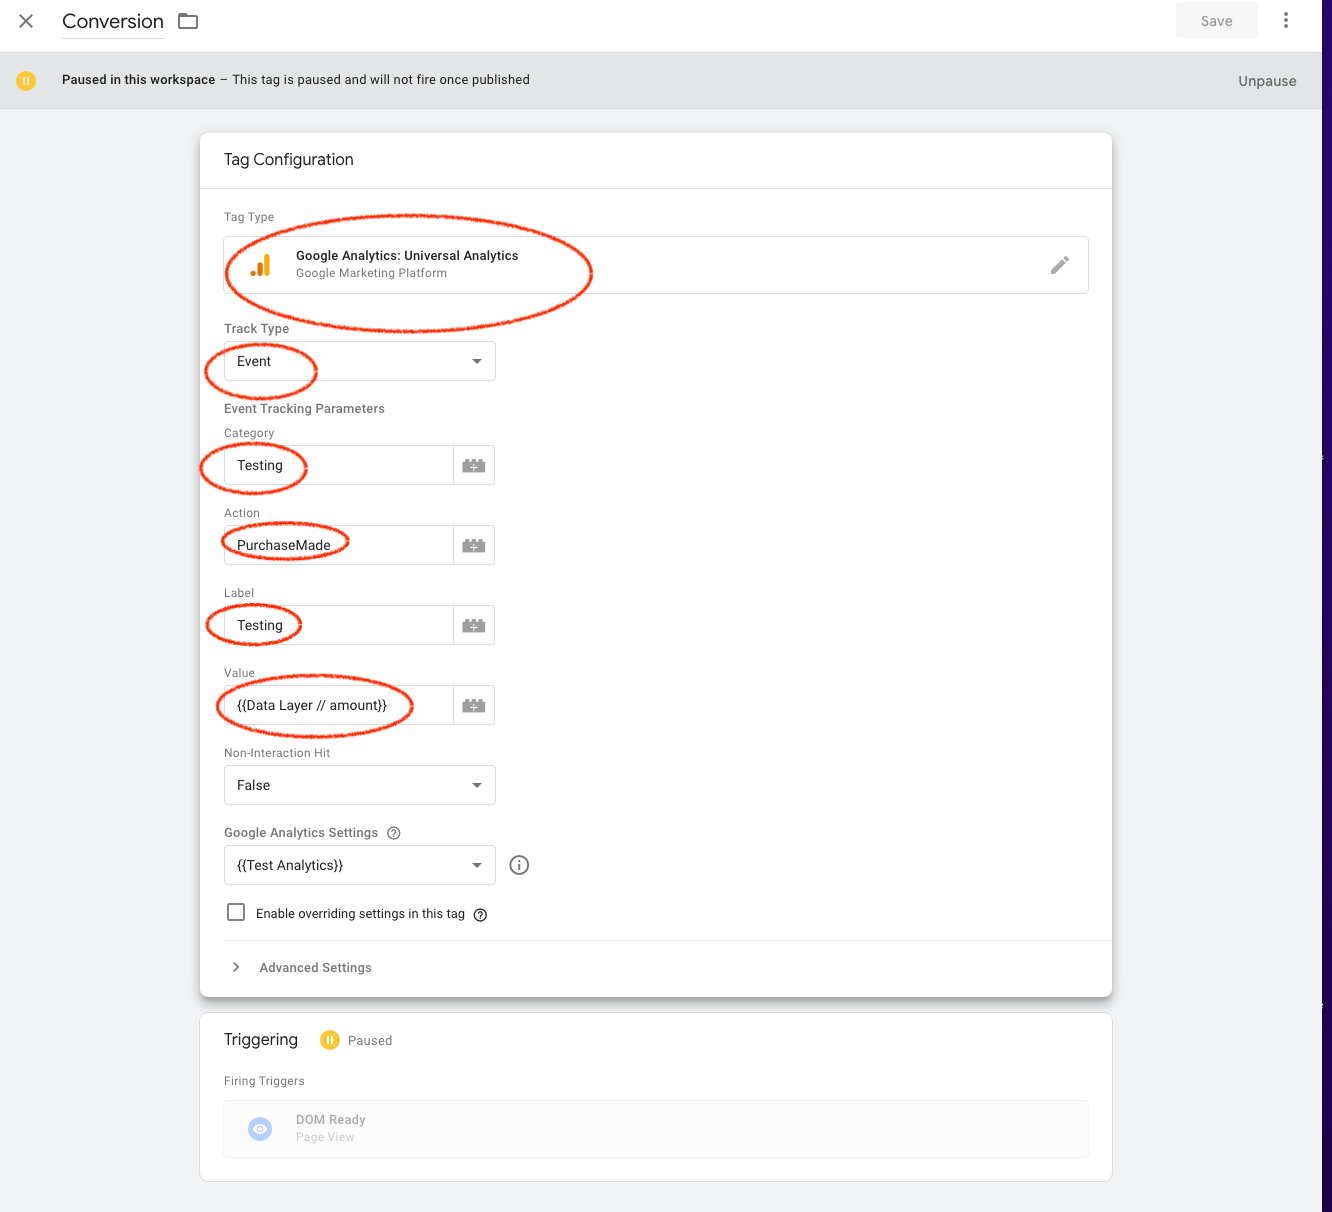
As you can see from our example, we set the amount to read from Data Layer, you can hard code this value as well.
Second step is settin up an event trigger using your thank you page URL
For this, select "Page View" as Trigger Type and add Page Path exception for your thank you page URL. Check our example below.
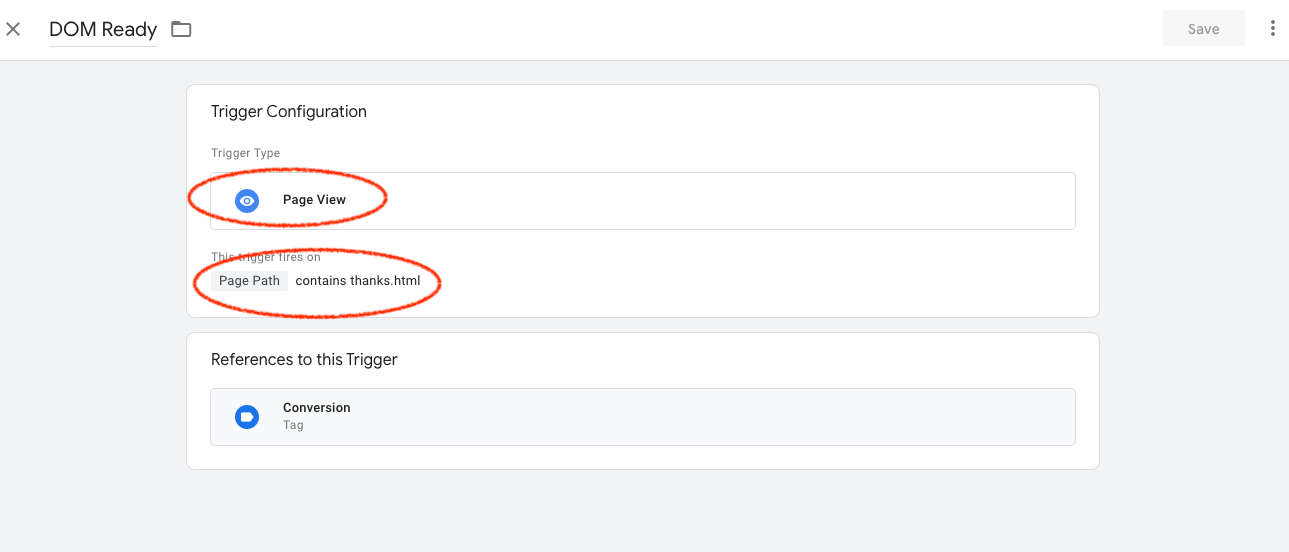
That's it!
Trigger an Event (Conversion) in Google Analytics (GA) based on Custom Event
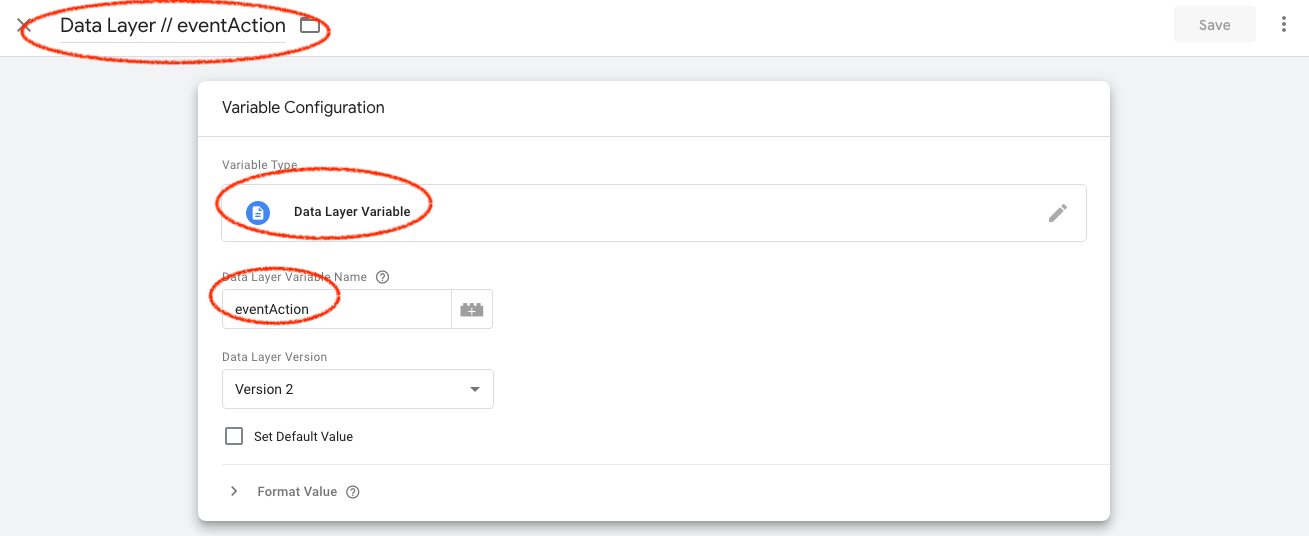
Create 4 Data Layer variables
eventAction
eventValue
eventCategory
eventLabel
Here is one example, repeat this for all the variables above.
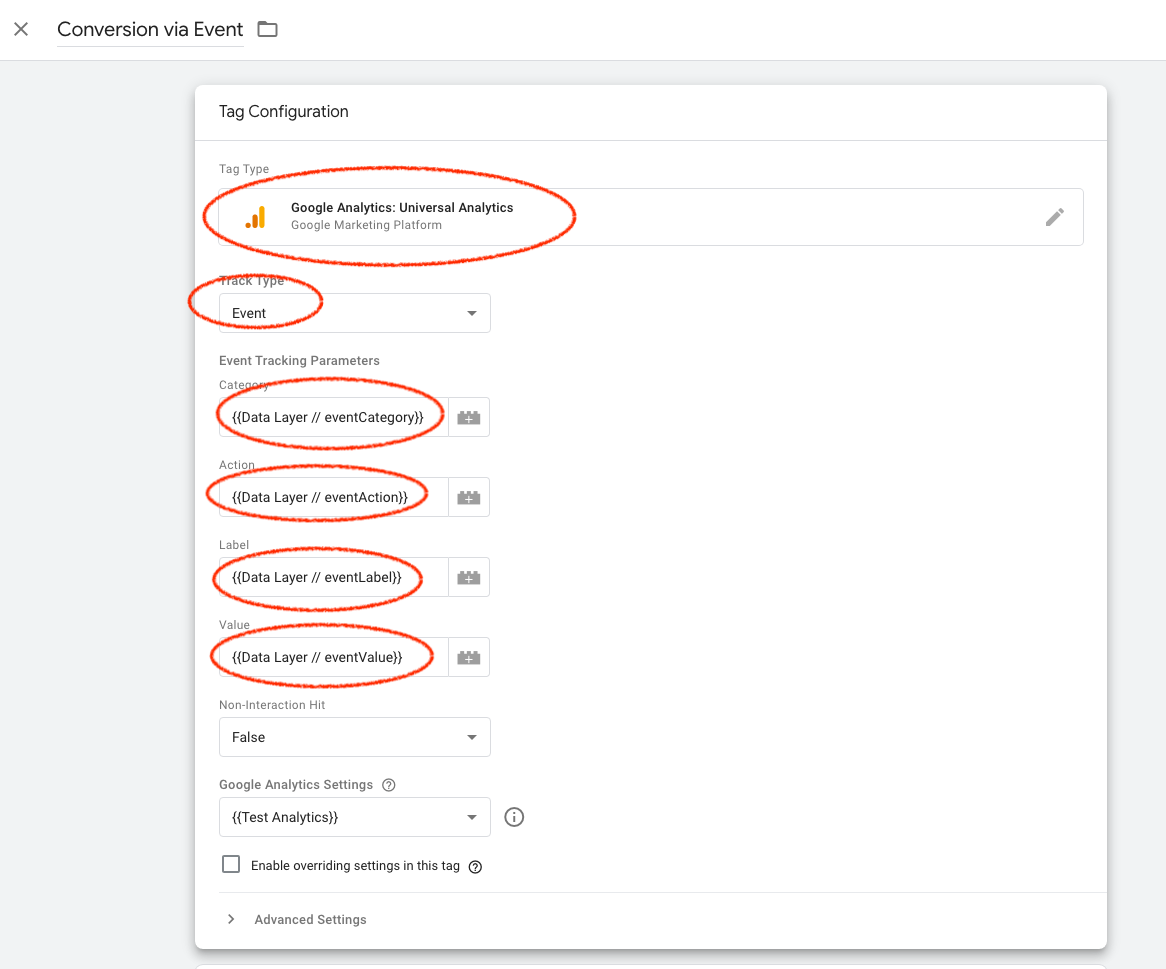
Configure your Event in GTM
Create your conversion event tag and use the above variables to autofill your event as shown in the image.
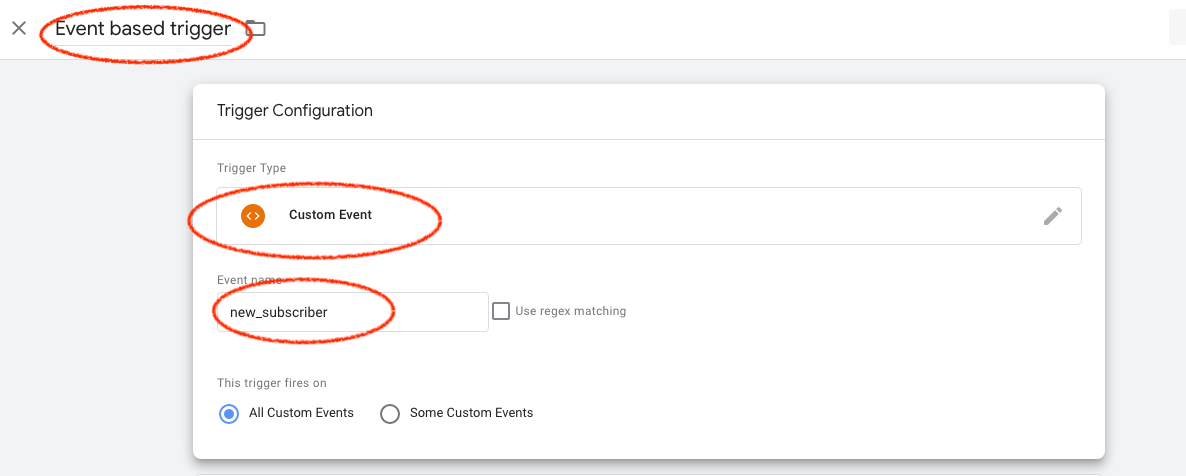
Set event based trigger
As shown below. We used "new_subscriber" as event name, you can use anything you want.
Add the trigger to your page (Method 1)
Add the following dataLayer code ABOVE your GTM script on your thank you page.
<script>
    window.dataLayer = window.dataLayer || [];
</script>
<script>
    // dataLayer.push({'amount': 11})
    window.dataLayer.push({
        'event': 'new_subscriber',
        'eventCategory': 'testcat2',
        'eventAction': 'myaction2',
        'eventLabel': 'mylabel2',
        'eventValue': 23,
    });

</script>
<script>(function(w,d,s,l,i){w[l]=w[l]||[];w[l].push({'gtm.start':
        new Date().getTime(),event:'gtm.js'});var f=d.getElementsByTagName(s)[0],
    j=d.createElement(s),dl=l!='dataLayer'?'&l='+l:'';j.async=true;j.src=
    'https://www.googletagmanager.com/gtm.js?id='+i+dl;f.parentNode.insertBefore(j,f);
})(window,document,'script','dataLayer','GTM-XXXXX');</script>
Add the trigger to your page (Method 2)
If you want to trigger this event with a button click.
You can use the following code.
<button onclick="window.dataLayer.push({
            'event': 'new_subscriber',
            'eventCategory': 'testcat2',
            'eventAction': 'myaction2',
            'eventLabel': 'mylabel2',
            'eventValue': 23,
        });">Signup</button>
After you implemented, trigger the event on your page and head to GA to see the data in action.
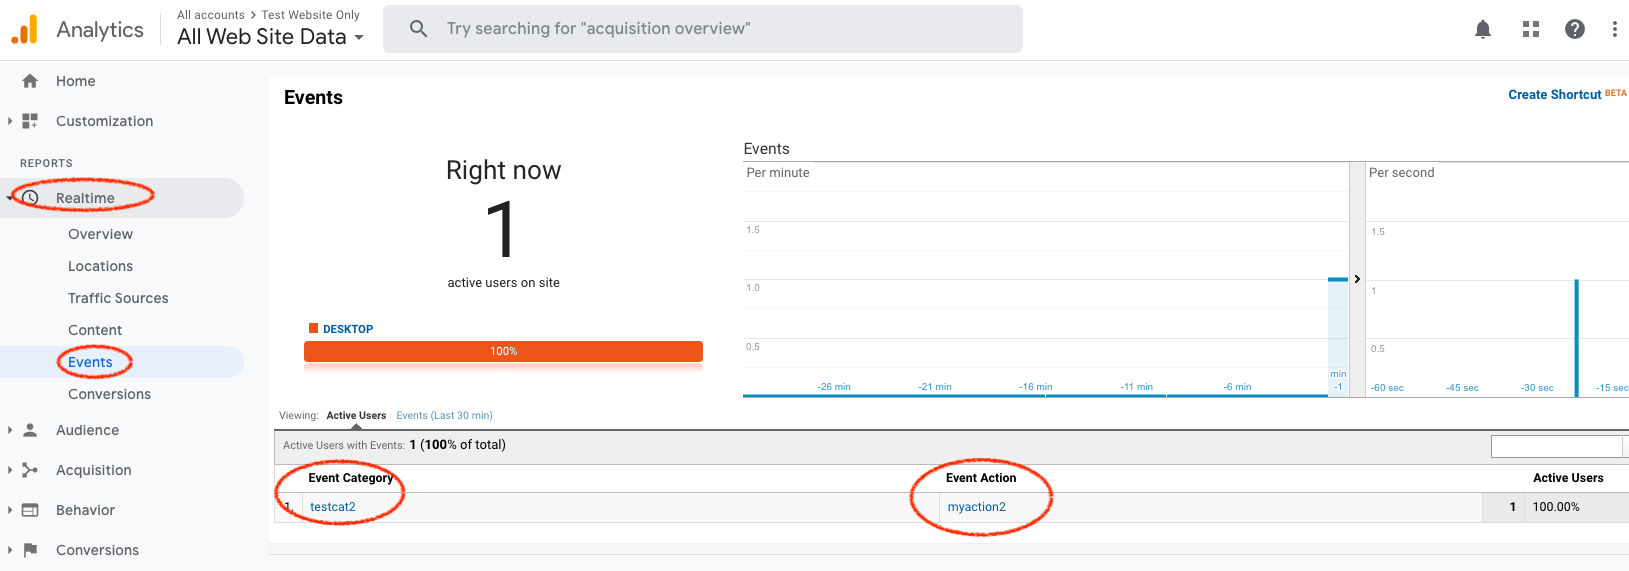
The UTM will be associated with your event as well
Or you can see it under Behavior > Events > Top Events (this may take longer to show up after your test)

Send form data with UTMs to a webhook (e.g. Zapier)
You can send form data with all the UTMs to a webhook in GTM.
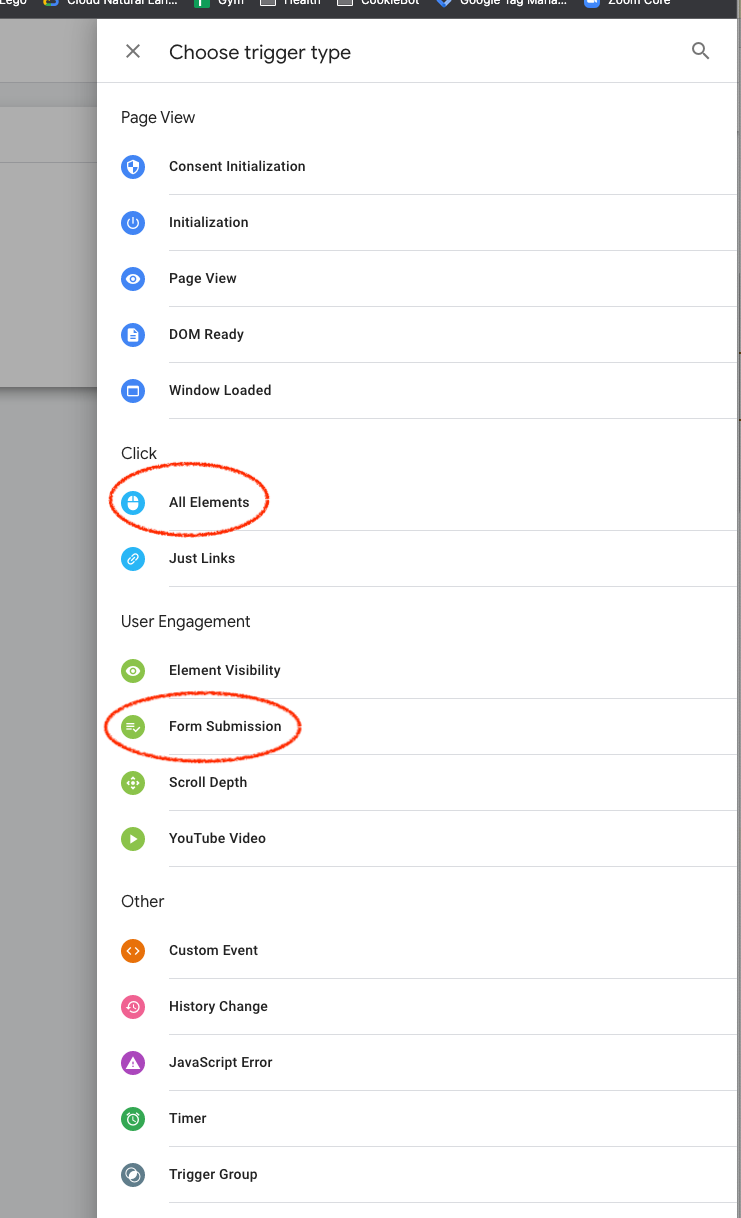
Create a trigger
This is a trigger for your tag. It can be as simple as button click or form submitted.
Create a variables that will capture your form object
Based on the trigger selected, this will change. Basically, you want to capture the form object using gtm.element. If your trigger is a form submit button, then your variable may look like this
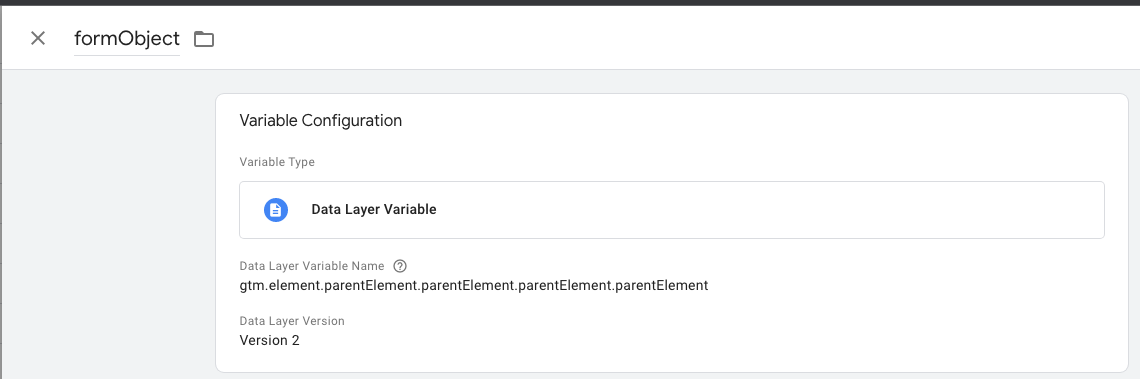
//Data Layer Variable Name
gtm.element.parentElement.parentElement.parentElement.parentElement
Create a tag
Finally create CustomHTML tag to send the collected data to your webhook (e.g. Zapier)
<script>
setTimeout(function(){

        var form_obj = jQuery({{formObject}})
        var emailFilled = $('#default_email',form_obj).val() != ''

        if (emailFilled){
          var data = handlj.param(HandL.getAll())
          var form_data = form_obj.serialize()
          var xmlHttp = new XMLHttpRequest();
          xmlHttp.open( "GET", 'https://hooks.zapier.com/hooks/catch/1234567/abcdefg/?'+data+"&"+form_data, false ); // false for synchronous request
          xmlHttp.send( null );
          console.log(form_data)
        }else{
         console.log("Not triggered")
        }

}, 100);

</script>
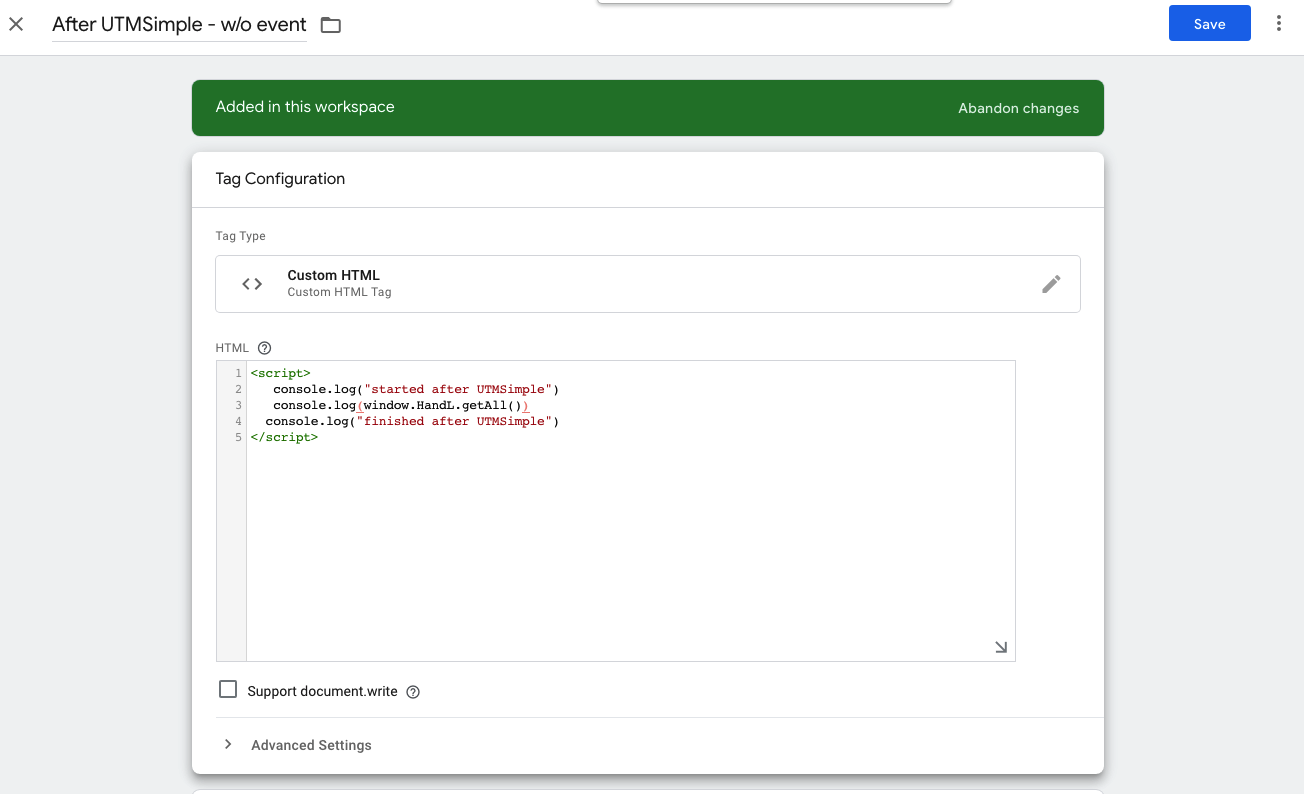
Trigger Custom Code (Javascript) After UTMSimple Loaded
In some cases, you may want to trigger a custom JavaScript / code after collecting all the UTM data.
In order to accomplish this, you can leverage sequence feature in GTM
Simply create your custom tag (it could be any type of tag but here we are giving example as HTML/JS)
like shown here...
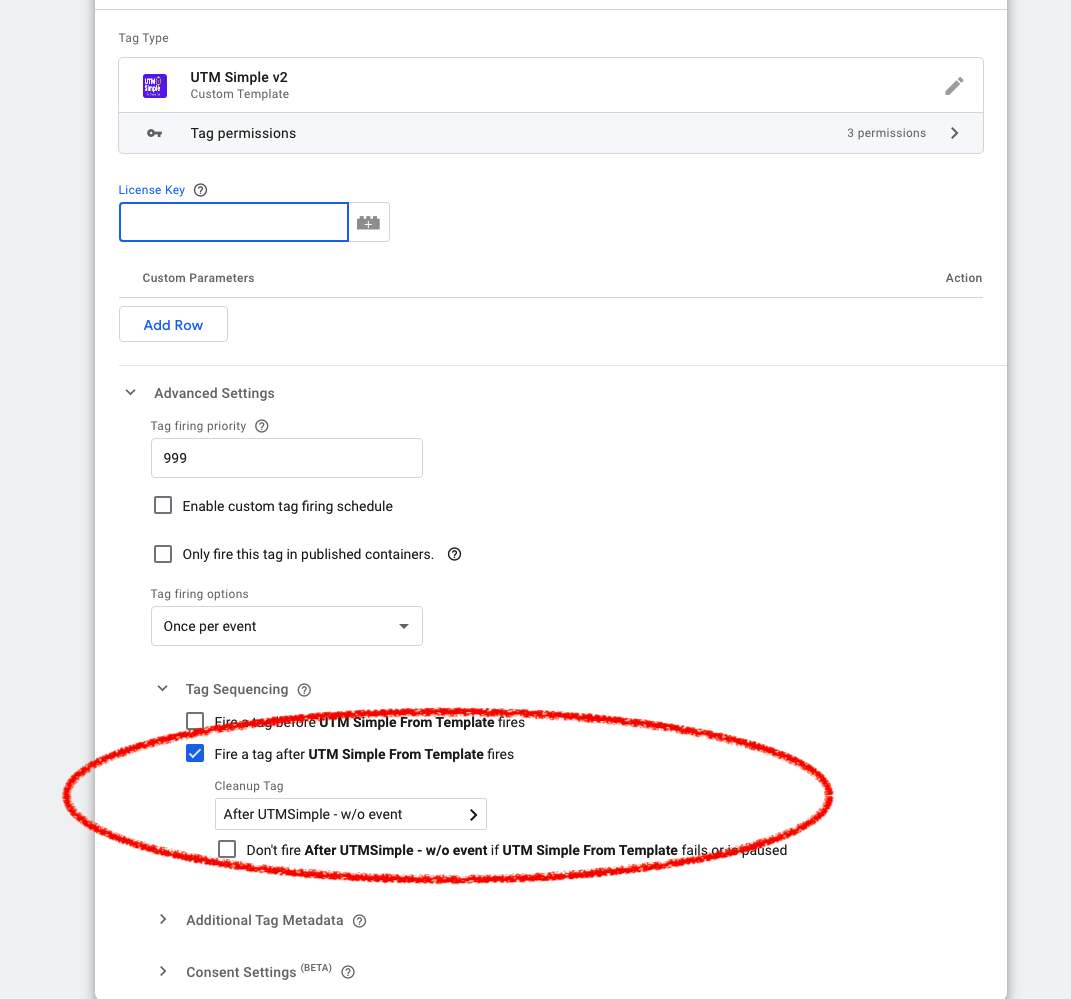
After that, go to UTM Simple Template Tag, Click Tag Sequencing and Select "Fire a tag after UTM Simple From Template fires" And select your custom tag that you created from step 1.
It will look like this...
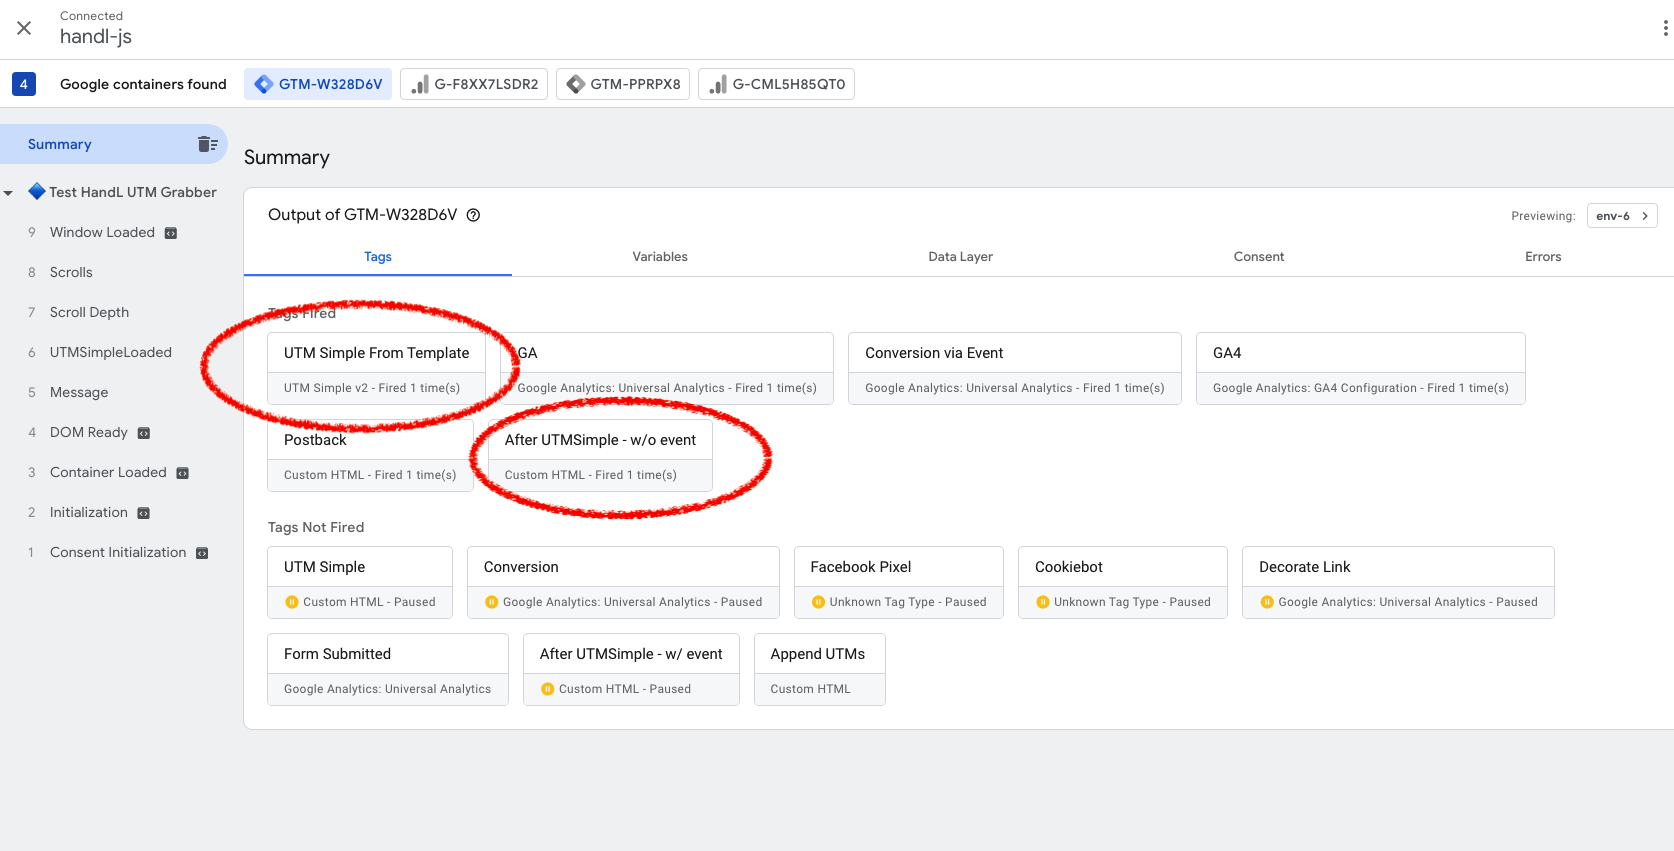
Voila! you are all set!
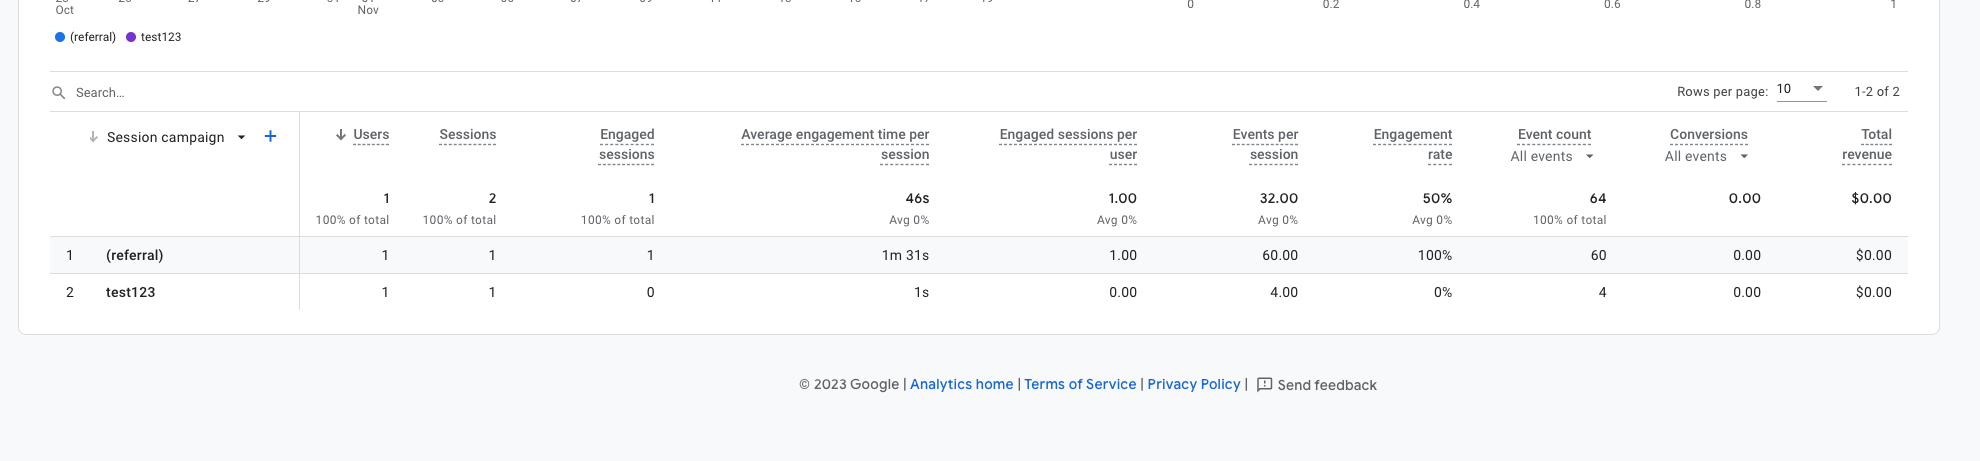
Track UTMs in GA4 using GTM
Before you continue make sure you
you set it up UTM Simple template in GTM Basic UTM tracker setup in Google GTM
And also you created variables Creating Variables in GTM for UTM Tracking
Add Google Analytics (GA4) tag and set it up
After you add the Google Analytics 4 tag
Set Configuration Parameter as follows
Field Name: campaign_name and Value: {{utm_campaign}}
Field Name: campaign_source and Value: {{utm_source}}
Field Name: campaign_medium and Value: {{utm_medium}}
Field Name: campaign_content and Value: {{utm_content}}
Field Name: campaign_term and Value: {{utm_term}}
Field Name: page_location and Value: {{handl_url}}
Field Name: send_page_view and Value: true

After deployig the new container, refresh your site (make sure UTMs are appended to the URL) and confirm in realtime GA4. Your traffic should be tagged with proper UTM under "Traffic acquisition". Make sure you are searching by "Session campaign"