Facebook Conversion API (FBCAPI)
- Zapier to Facebook Conversion API (FBCAPI)
- Guide to UTMSimple’s Facebook CAPI Integration
- HubSpot Facebook CAPI Integration: Complete Workflow Setup Guide
- Funnelish Facebook CAPI Integration: Complete Setup Guide
Zapier to Facebook Conversion API (FBCAPI)
Set Zapier from your Facebook account as Partner
- Go to the Data Sources tab in Meta Events Manager.
- Select Settings.
- Scroll down and select Choose a Partner.
- Select Zapier and follow the setup instructions.
see more here Facebook Documentation
Head back to Zapier
- Find your actions (This can be vary depending on the integration e.g. Click Funnel Purchase Event or Webhook Catch Event)
- Add
Facebook Conversionsas action and select appropriate Event (we selected Lead Event)
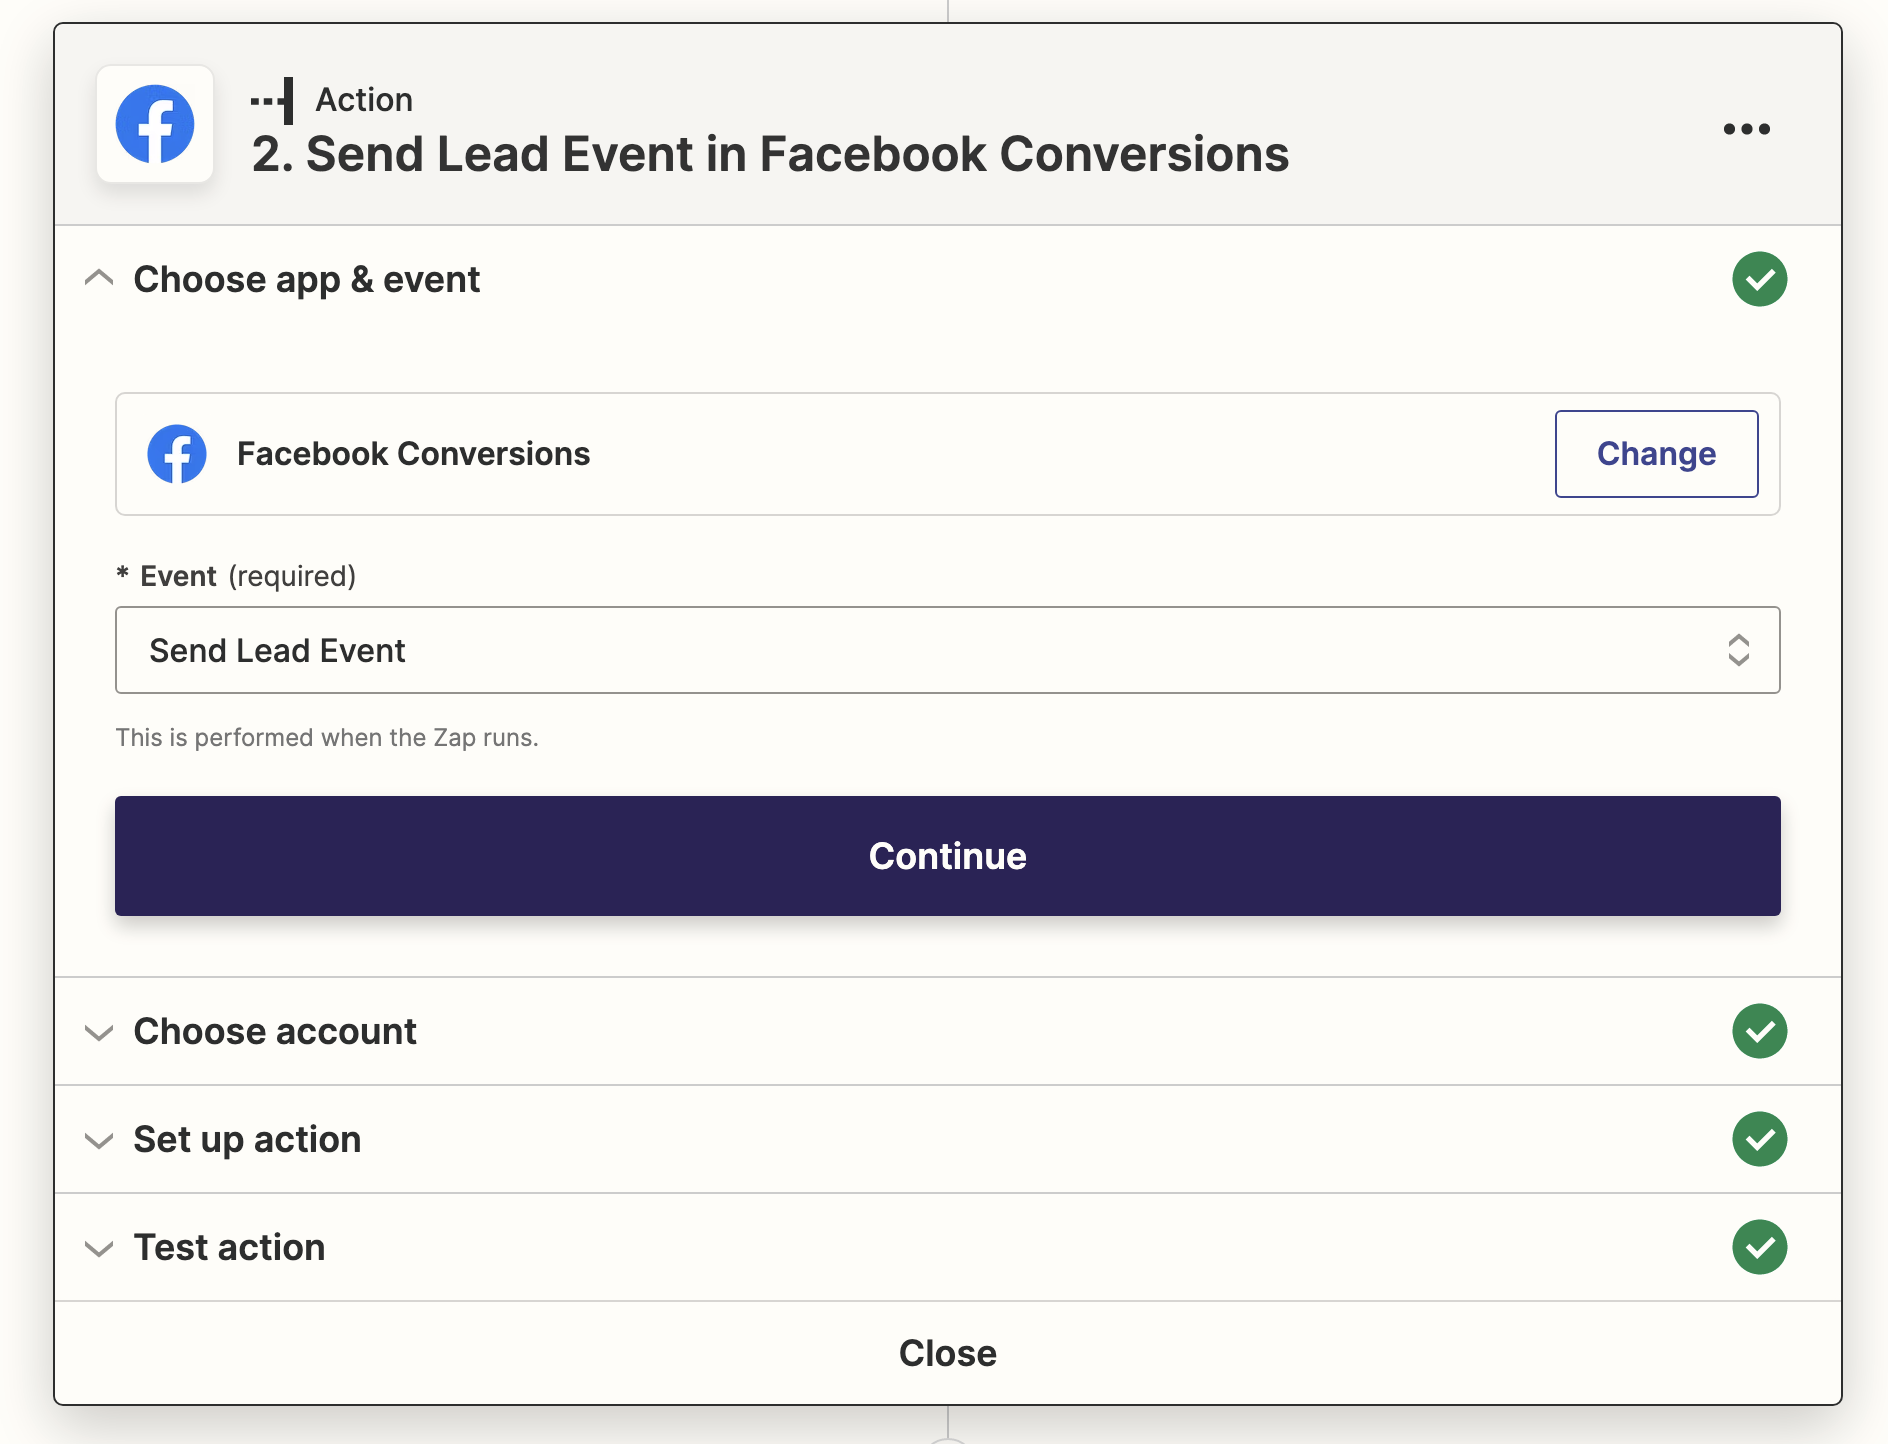
- Select your Business Ccount and Pixel

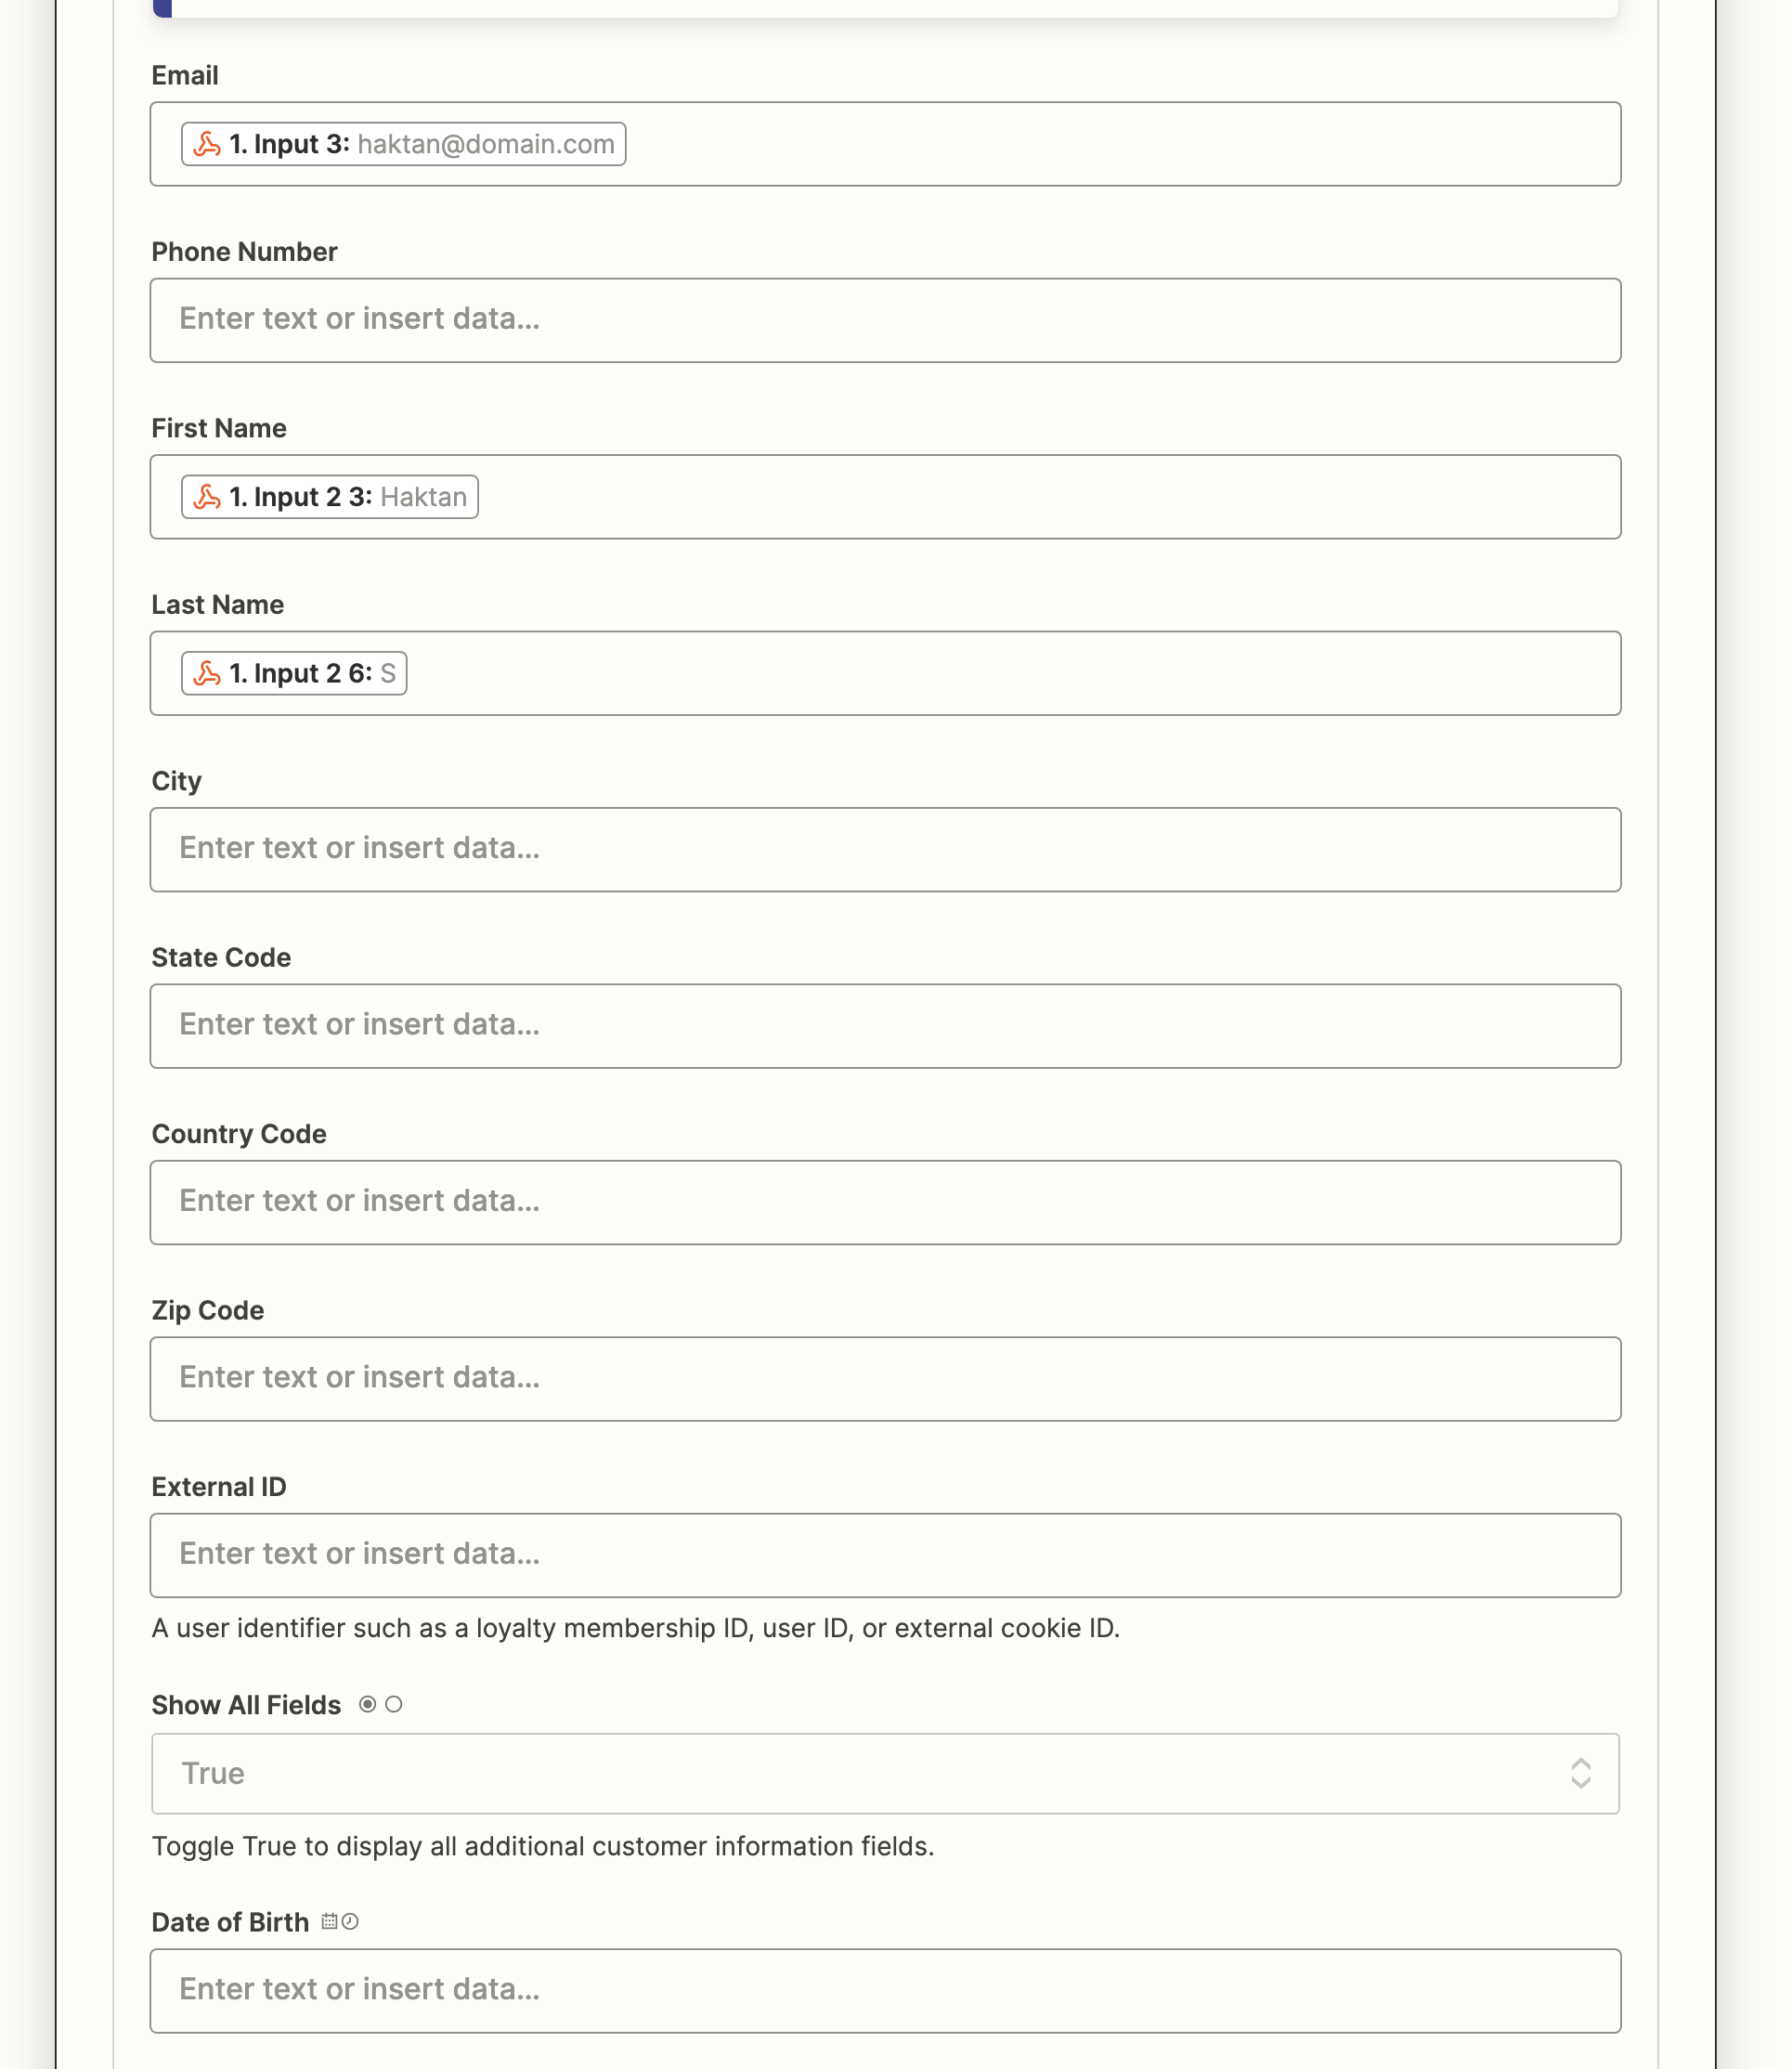
- Set up the action based on the data you collect (you should send name and email as minimum for Lead event. And more for Purchase event)
That's it!
Guide to UTMSimple’s Facebook CAPI Integration
In a world of increasing data privacy measures, ad blockers, and cookie restrictions, server-side tracking has become essential for accurate marketing attribution. UTMSimple’s Facebook Conversion API (CAPI) integration is designed to make this powerful technology accessible and seamless.
we offer simple one-click setups for popular platforms, this guide is for who need to integrate FB Capi with their CRM.
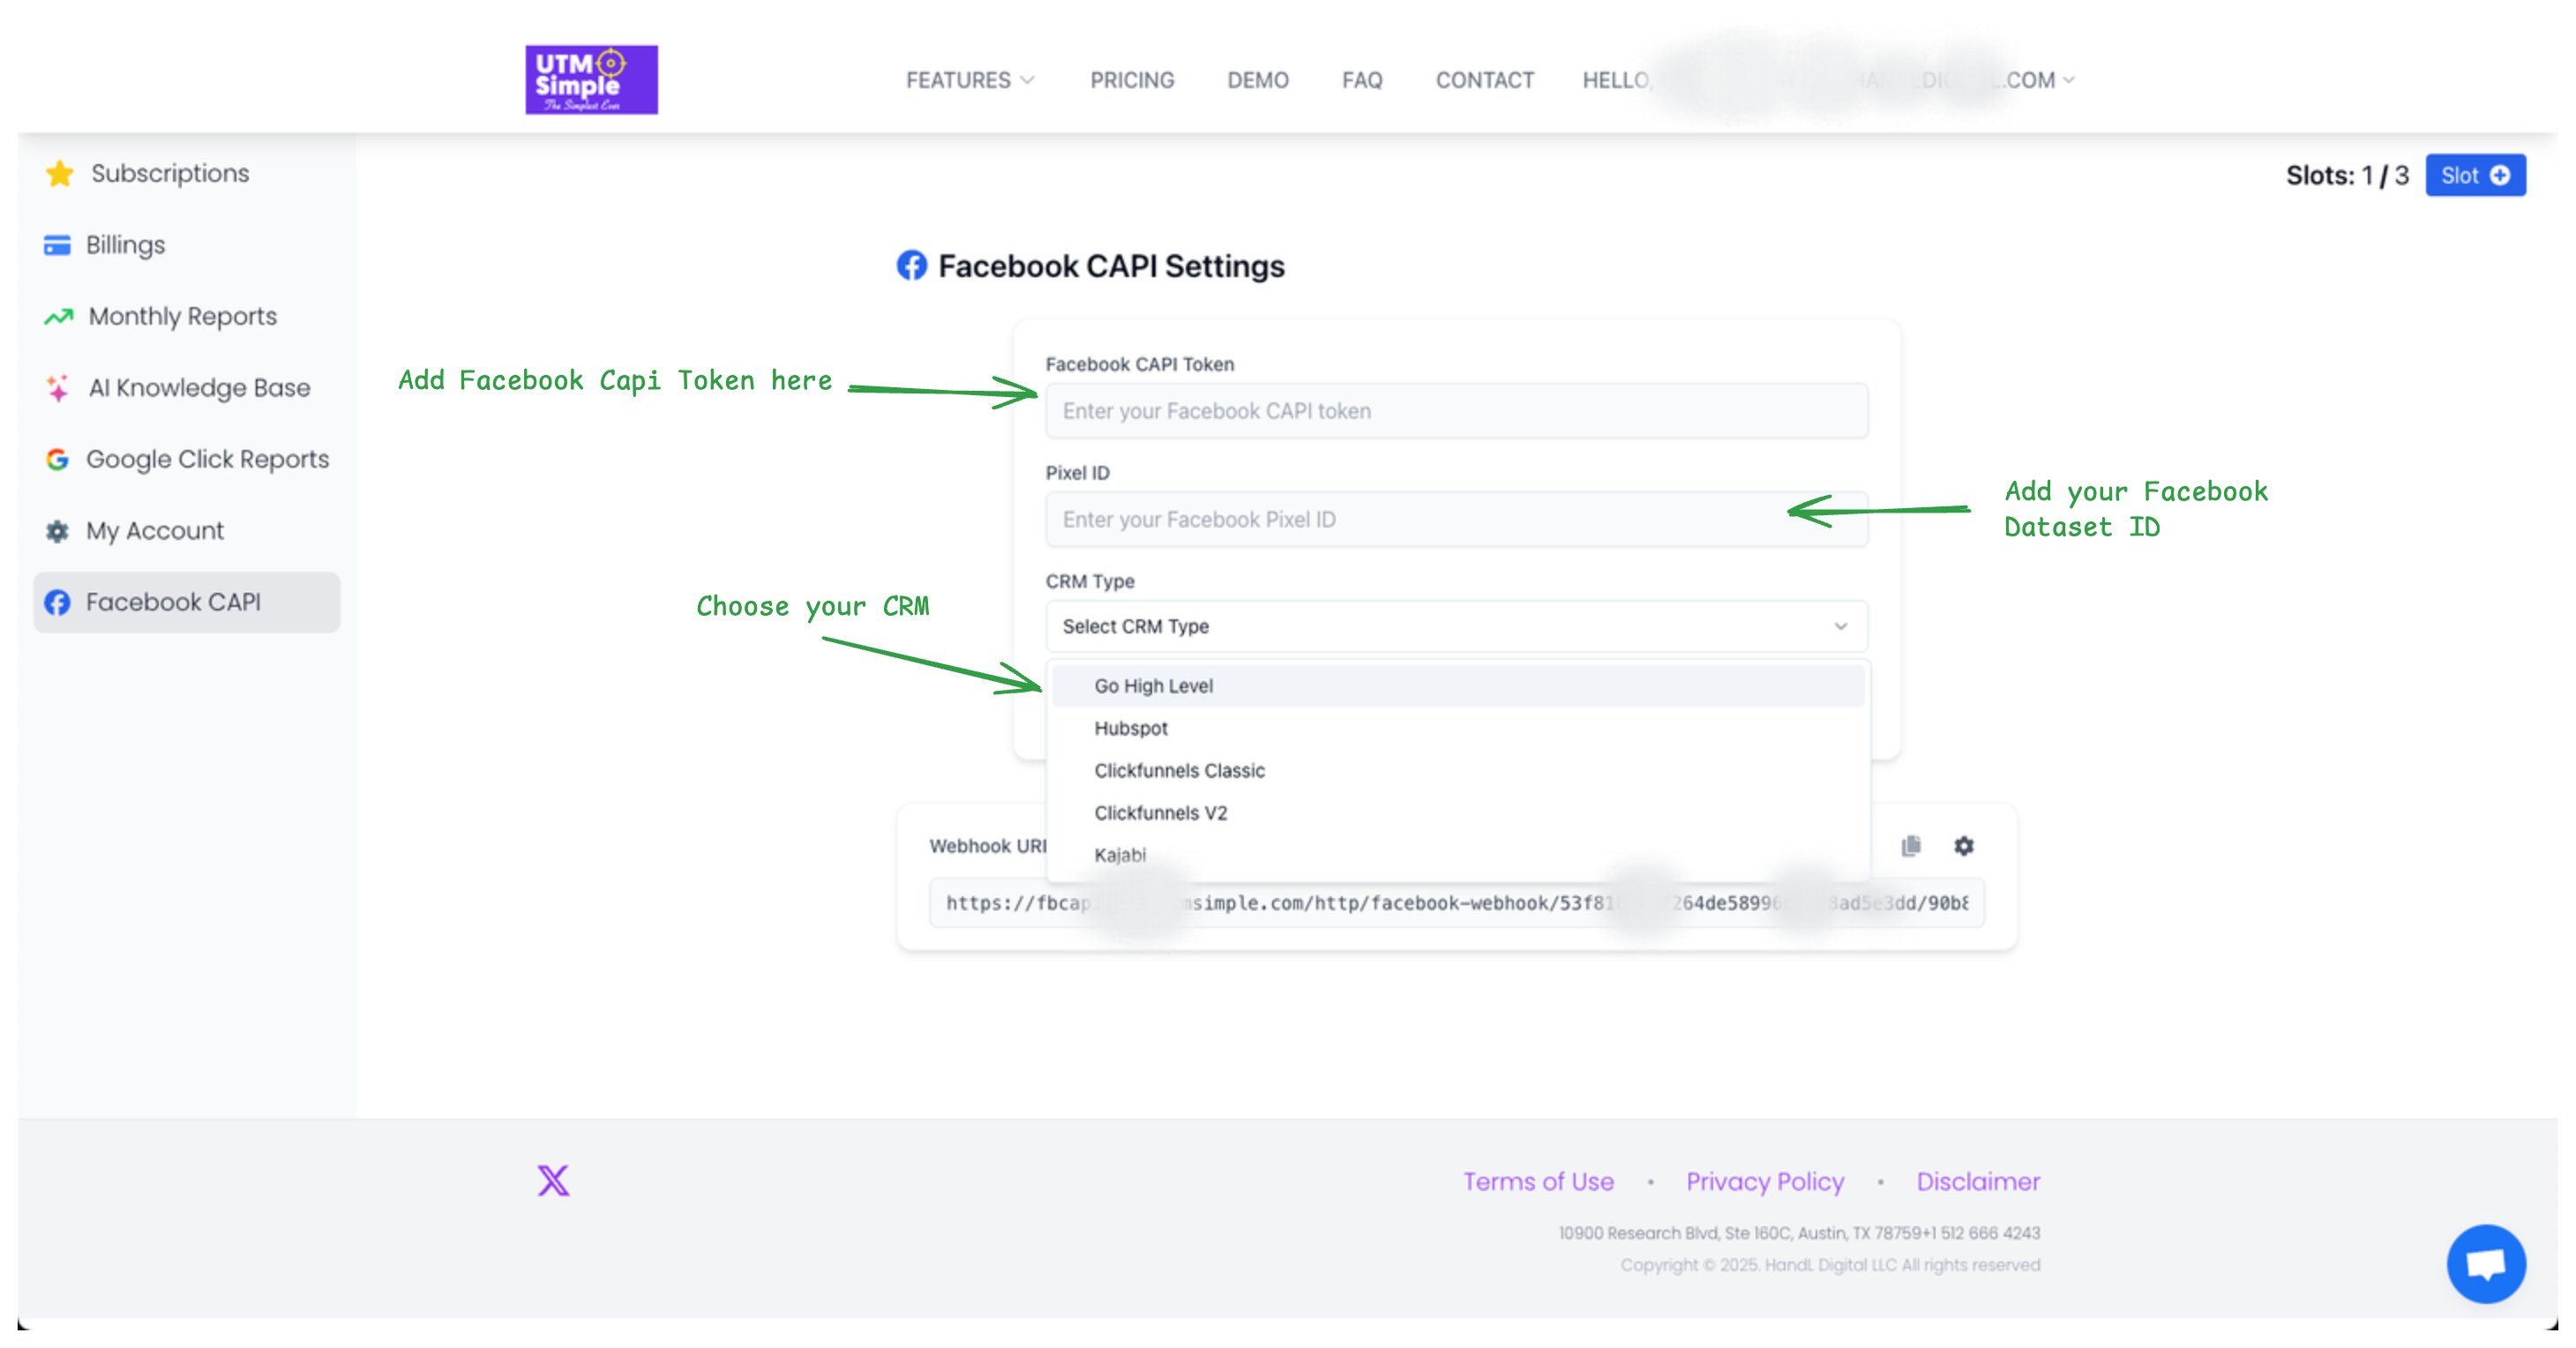
Step 1: Get Your Unique Webhook Endpoint
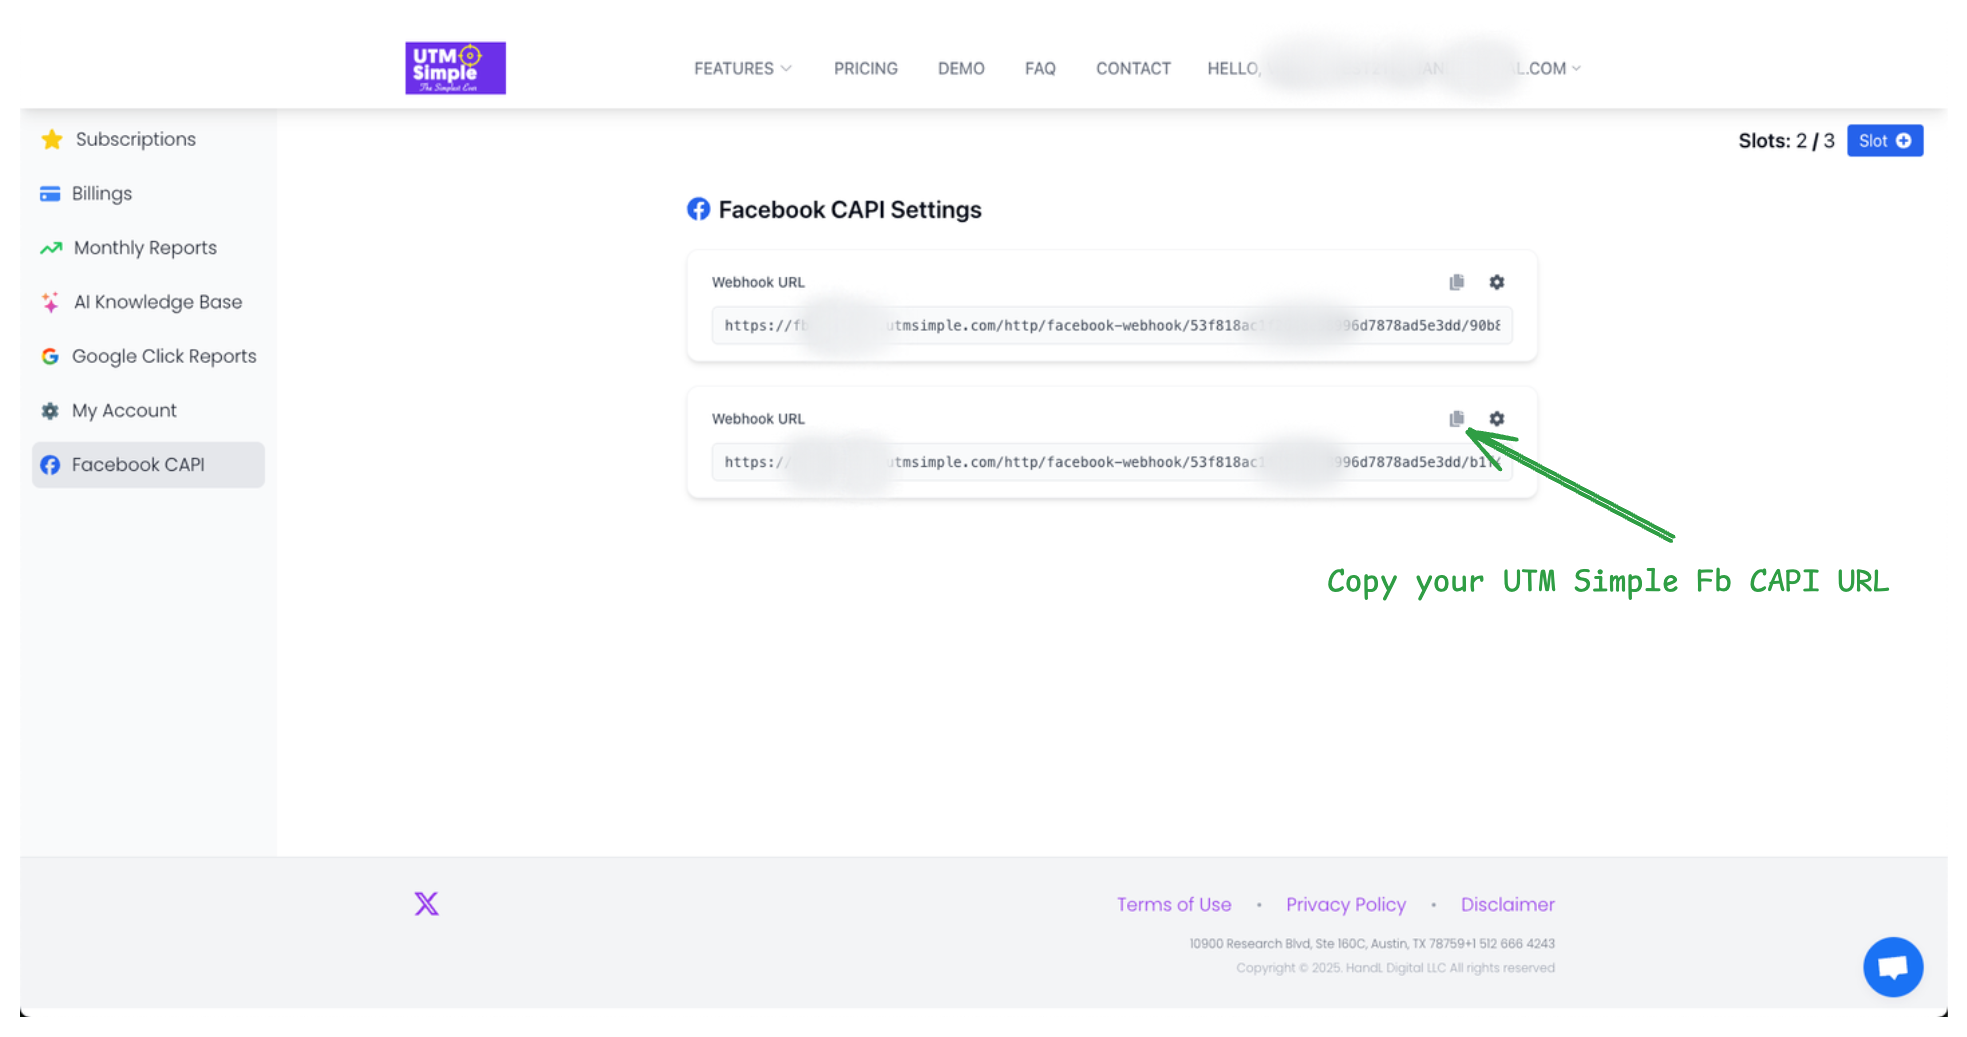
Once you subscribe to the Facebook CAPI product on the UTMSimple website, you will be assigned a unique webhook URL. This is your personal endpoint for sending all server-side events.
You can find this endpoint in your UTMSimple dashboard. You have to enter your Facebook CAPI token, Dataset ID and select your desired CRM to get unique URL. Treat this URL as a secure credential; it is the key that connects your system to ours.
Step 2: Send Your Event Data
This is where the magic happens. Our system is designed for maximum flexibility, whether you use a popular CRM or a fully custom-built platform.
Seamless Integration with Leading CRMs
Our webhook endpoint is pre-configured to understand the specific data formats from many of the tools you already use. We currently have native support for parsing events from:
- GoHighLevel
- HubSpot
- ClickFunnels (both Classic and v2)
- Kajabi
- Funnelish
If you use one of these platforms, you can simply point their webhook notifications to your UTMSimple endpoint, and our system will handle the complex task of translating that data for Facebook CAPI.
Building a Custom Payload
If you're integrating with a different CRM or a custom application, you can send a POST request with a standard JSON payload. Our system will extract the relevant details and forward them to Facebook. For best results, structure your payload with the following key fields.
Essential Payload Fields:
-
Event Information
-
event_name: The Facebook standard event you're tracking (e.g.,Purchase,Lead,CompleteRegistration). -
event_source_url: The URL where the event occurred.
-
-
User Data (for matching)
-
email&phone: Hashed user identifiers are critical for matching conversions. -
client_ip_address&client_user_agent: Helps Facebook attribute the event correctly. -
fbp: The Facebook browser ID cookie (_fbp), if available.
-
-
Conversion and Attribution Data
-
value¤cy: The monetary value and currency of the conversion. -
utm_params: Any UTM parameters (utm_source,utm_medium, etc.) associated with the user session. Our system will automatically capture these and pass them to Facebook as custom properties for deeper insights.
-
Sample Custom Payload: Here is an example of a well-formed JSON payload for a custom integration:
{
  "event_name": "Lead",
  "user_data": {
  "email": "test@example.com",
  "phone": "15551234567",
  "client_ip_address": "123.123.123.123",
  "client_user_agent": "Mozilla/5.0 (Windows NT 10.0; Win64; x64) AppleWebKit/537.36 (KHTML, like Gecko) Chrome/108.0.0.0 Safari/537.36",
  "fbp": "fb.1.1558571054389.1098115397"
  },
  "event_source_url": "https://yourwebsite.com/contact",
  "utm_params": {
  "utm_source": "google",
  "utm_medium": "cpc",
  "utm_campaign": "spring_sale"
  }
}
By leveraging UTMSimple's Facebook CAPI integration, you gain a reliable, secure, and powerful way to handle server-side event tracking, ensuring you never miss a conversion.
Thank you for reading this, If you have followed this guide you are all setup with your FB CAPI integration, if you have any questions you can directly reach out to us via our chat support or email us at support@utmsimple.com.
HubSpot Facebook CAPI Integration: Complete Workflow Setup Guide
HubSpot's powerful marketing automation combined with Facebook's Conversion API creates an unbeatable combination for tracking and optimizing your marketing campaigns. This guide will walk you through setting up UTMSimple's Facebook CAPI integration specifically for HubSpot workflows.
Why HubSpot + Facebook CAPI?
HubSpot workflows allow you to trigger actions based on contact behavior, form submissions, deal stages, and more. By integrating these workflows with Facebook CAPI through UTMSimple, you can:
- Track multi-touch journeys from initial lead to customer conversion
- Send server-side events that bypass ad blockers and privacy restrictions
- Optimize Facebook campaigns based on actual business outcomes
- Maintain data accuracy even when cookies are blocked
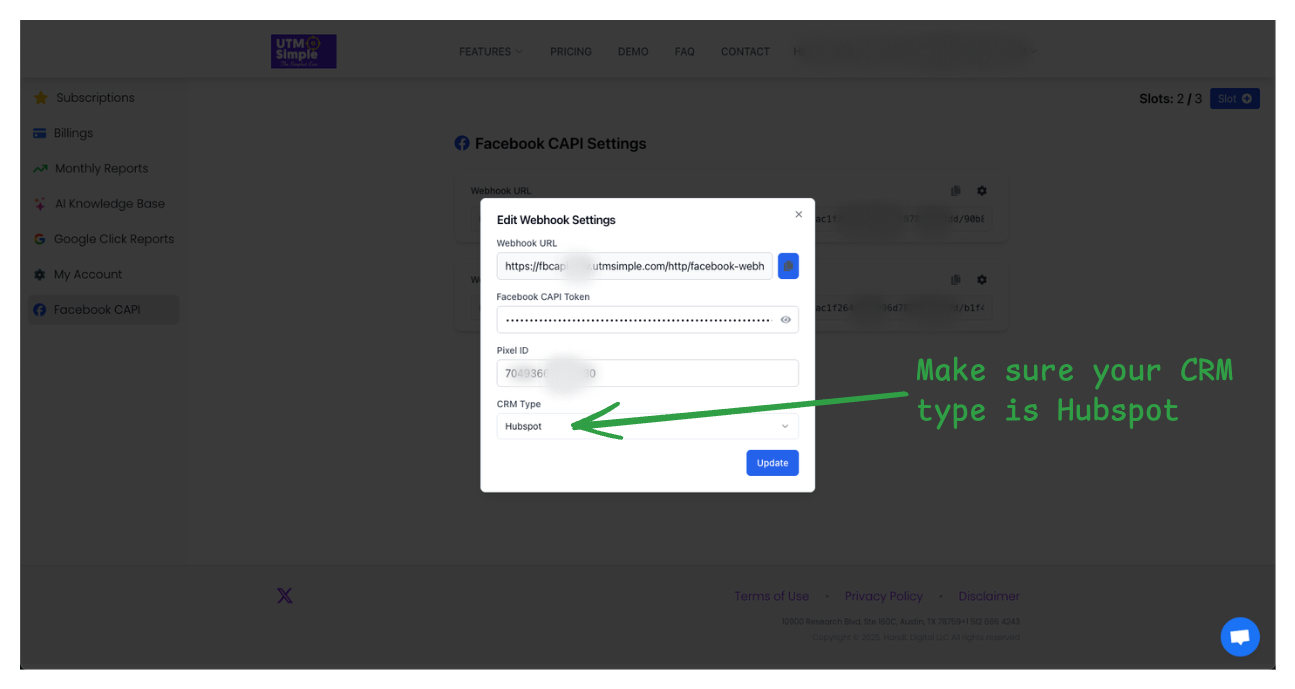
Step 1: Get Your UTMSimple Webhook URL
First, you'll need to set up your Facebook CAPI integration in UTMSimple:
- Subscribe to the Facebook CAPI product on UTMSimple
- In your UTMSimple dashboard, enter your:
- Facebook CAPI Access Token
- Facebook Pixel ID (Dataset ID)
- Select HubSpot as your CRM type
- Copy your unique webhook URL - this is what you'll use in HubSpot workflows
Step 2: Configure HubSpot Workflows
Creating a Basic Lead Tracking Workflow
for more details you can check this guide: UTMSimple facebook capi integration
Adding the Webhook Action
- Add an action to your workflow
- Select "Send a webhook" from the list of actions
-
Configure the webhook with these settings:
- Method: POST
- URL: Your UTMSimple webhook URL
- Request body: JSON format (see example below)
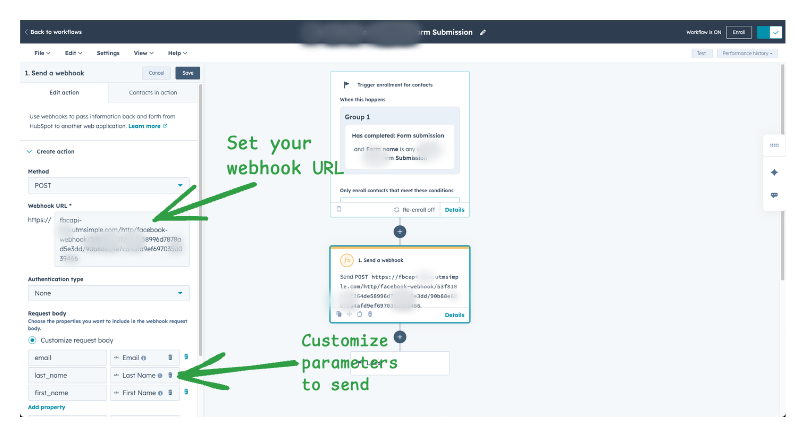
Sample Webhook Payload for HubSpot
Here's a recommended JSON structure for your HubSpot webhook:
{
  "format": "custom",
  "event_type": "Lead",
  "email": "{{ contact.email }}",
  "phone": "{{ contact.phone }}",
  "first_name": "{{ contact.firstname }}",
  "last_name": "{{ contact.lastname }}",
  "utm_source": "{{ contact.hs_analytics_source }}",
  "utm_medium": "{{ contact.hs_analytics_medium }}",
  "utm_campaign": "{{ contact.hs_analytics_campaign }}",
  "utm_term": "{{ contact.hs_analytics_term }}",
  "utm_content": "{{ contact.hs_analytics_content }}",
  "value": 0,
  "currency": "USD"
}
Step 3: Advanced Workflow Examples
Lead Qualification Workflow
Track when leads become Marketing Qualified Leads (MQLs):
{
  "format": "custom",
  "event_type": "CompleteRegistration",
  "email": "{{ contact.email }}",
  "phone": "{{ contact.phone }}",
  "utm_source": "{{ contact.hs_analytics_source }}",
  "utm_medium": "{{ contact.hs_analytics_medium }}",
  "utm_campaign": "{{ contact.hs_analytics_campaign }}",
  "value": 25,
  "currency": "USD"
}
Trigger: Contact property "Lifecycle Stage" changes to "Marketing Qualified Lead"
Deal Closed Won Workflow
Track actual revenue when deals close:
{
"format": "custom",
"event_type": "Purchase",
"email": "{{ contact.email }}",
"phone": "{{ contact.phone }}",
"utm_source": "{{ contact.hs_analytics_source }}",
"utm_medium": "{{ contact.hs_analytics_medium }}",
"utm_campaign": "{{ contact.hs_analytics_campaign }}",
"value": "{{ deal.amount }}",
"currency": "{{ deal.dealcurrencycode }}"
}
Trigger: Contact books a meeting through your booking link
Step 4: Testing Your Integration
- Create a test contact in HubSpot that meets your workflow criteria
- Monitor the workflow history to ensure the webhook fires successfully
- Check Facebook Events Manager to verify events are being received
Pro Tips for HubSpot Integration
Use Contact Properties Effectively
- Leverage HubSpot's built-in UTM tracking properties
- Set up custom properties for additional attribution data
- Use calculated properties for dynamic event values
Optimize Your Event Strategy
- Lead: Form submissions, content downloads
- CompleteRegistration: MQL conversion, trial signups
- Purchase: Closed won deals, subscription renewals
- Schedule: Demo bookings, consultation requests
Handle Multiple Touchpoints
Create different workflows for different customer journey stages to build a complete attribution picture in Facebook.
Troubleshooting Common Issues
Webhook not firing: Check that your enrollment criteria are correctly set and the contact meets all conditions.
Events not appearing in Facebook: Verify your Facebook CAPI token and Pixel ID are correctly entered in UTMSimple.
Missing UTM data: Ensure UTM parameters are being captured on your forms and landing pages.
Next Steps
Once your HubSpot workflows are sending events to Facebook CAPI, you can:
- Create custom audiences based on these server-side events
- Optimize your Facebook campaigns for your most valuable actions
- Build lookalike audiences from your highest-value customers
- Set up automated bidding based on actual business outcomes
For additional support or advanced configurations, visit docs.utmsimple.com or reach out to our team at support@utmsimple.com.
Funnelish Facebook CAPI Integration: Complete Setup Guide
Server-side tracking is essential in today’s privacy-focused world. By integrating your Funnelish funnels with Facebook’s Conversion API (CAPI) via UTMSimple, you’ll capture every funnel event (leads, purchases, etc.) even when ad blockers or cookie restrictions are in place. Funnelish itself highlights built-in Facebook Pixel & Conversion API support, making this integration a natural fit for optimizing your ad campaigns. With server-side events from Funnelish, you can:
- Track full funnel journeys: Attribute ads to actual leads and sales from your funnels.
- Bypass blockers: Server-side events aren’t affected by browser ad blockers or cookies, so no conversions are missed.
- Optimize campaigns: Use accurate funnel data to improve Facebook ad performance (e.g. optimize for real Purchase events).
- Maintain privacy compliance: Send only hashed user data (emails/phones) and UTM tags to Facebook, as UTMSimple automatically captures UTM parameters for deeper attribution.
Step 1: Get Your UTMSimple Webhook URL
After subscribing to UTMSimple’s Facebook CAPI product, log in to your UTMSimple dashboard and go to Facebook CAPI Settings. Enter your Facebook CAPI Access Token and Facebook Pixel ID (Dataset ID), and choose Funnelish as the CRM type. When you save, UTMSimple will generate a unique webhook endpoint URL for your account. Copy this URL — it is your secure, personal endpoint that connects Funnelish to Facebook CAPI.

UTMSimple’s documentation notes: “You have to enter your Facebook CAPI token, Dataset ID and select your desired CRM to get unique URL”. Treat this URL like a password and do not share it publicly.
Step 2: Configure Funnelish Automation
In Funnelish, set up an Automation to send events to UTMSimple. Open your Funnelish funnel and click the Automations (workflow) icon. Create a new automation and select an appropriate trigger for the events you want to track. For example:
- On Purchase – fires when a purchase is completed (ideal for sending Purchase events with revenue).
- Optin – fires when a visitor submits their email on any funnel page (use this to send Lead events).
- (Other triggers like Recurring Payment can be used for subscription renewals, or Purchase Attempt for abandoned carts.)

Next, click the + button under the trigger to add an action, choose Webhook, and paste your UTMSimple webhook URL into the URL field. Funnelish will now POST your funnel data (contact info, order details, etc.) to UTMSimple whenever the trigger fires. UTMSimple is “pre-configured to understand” Funnelish’s event format, so it will automatically parse those fields (like email, event_name, value, currency, etc.) and forward them to Facebook CAPI. You typically don’t need to build a custom JSON payload – just ensure your funnel collects the needed data (email or phone for user matching, and order value for revenue tracking).
Step 3: Testing Your Integration
After saving the automation, test it end-to-end:
- Run a test funnel: submit a lead or place a test order in your Funnelish funnel.
- Check UTMSimple: In your UTMSimple dashboard (Live Events or logs), you should see the event recorded. UTMSimple notes that its solution ensures “you never miss a conversion”, so this test should appear.
- Check Facebook Events Manager: Log into Facebook Events Manager for your Pixel. You should see the new event (Lead or Purchase) coming through the Conversion API.
If you don’t see the event, verify that your UTMSimple token, Pixel ID, and Funnelish webhook URL are all correct. Make sure the correct trigger is firing in Funnelish and that the automation is active. Once confirmed, your Funnelish funnel events will reliably flow into Facebook via UTMSimple.
Pro Tips for Funnelish Integration
-
Use the Right Triggers:
- On Purchase for actual sales (maps to Facebook’s Purchase event).
- Optin for new email captures (maps to Lead or CompleteRegistration events).
- Recurring Payment triggers for subscription payments.
- Enable “Once per Customer” if available, so each contact only sends one event per purchase or lead.
- UTM Parameters: Ensure any UTMs are included in your funnel URLs. UTMSimple will automatically capture and forward UTM tags with each event, giving you full campaign attribution.
- Field Mapping: By default, Funnelish sends standard fields in the webhook. Make sure your funnel form collects Email (and Phone if possible), since UTMSimple uses those hashed identifiers for Facebook matching.
- Troubleshooting: If events aren’t arriving, use UTMSimple’s debug tools to see raw payloads. Confirm Funnelish’s workflow is active and that the webhook action is listed. Check that your UTMSimple webhook shows the correct CRM type (Funnelish) – this was chosen in Step 1.
Next Steps
With Funnelish events flowing to Facebook CAPI, you can now build audiences and optimize campaigns more effectively: create custom audiences from your high-value funnel leads and customers, run A/B tests on ad creative using server-side conversions as goals, and set up bid strategies based on the real revenue data. For further details or advanced setups, see the UTMSimple documentation or reach out to support@utmsimple.com. Now you’re all set – your Funnelish funnel is connected to Facebook’s Conversion API via UTMSimple, ensuring no conversion goes untracked.