
HubSpot Facebook CAPI Integration: Complete Workflow Setup Guide
HubSpot's powerful marketing automation combined with Facebook's Conversion API creates an unbeatable combination for tracking and optimizing your marketing campaigns. This guide will walk you through setting up UTMSimple's Facebook CAPI integration specifically for HubSpot workflows.
Why HubSpot + Facebook CAPI?
HubSpot workflows allow you to trigger actions based on contact behavior, form submissions, deal stages, and more. By integrating these workflows with Facebook CAPI through UTMSimple, you can:
- Track multi-touch journeys from initial lead to customer conversion
- Send server-side events that bypass ad blockers and privacy restrictions
- Optimize Facebook campaigns based on actual business outcomes
- Maintain data accuracy even when cookies are blocked
Step 1: Get Your UTMSimple Webhook URL
First, you'll need to set up your Facebook CAPI integration in UTMSimple:
- Subscribe to the Facebook CAPI product on UTMSimple
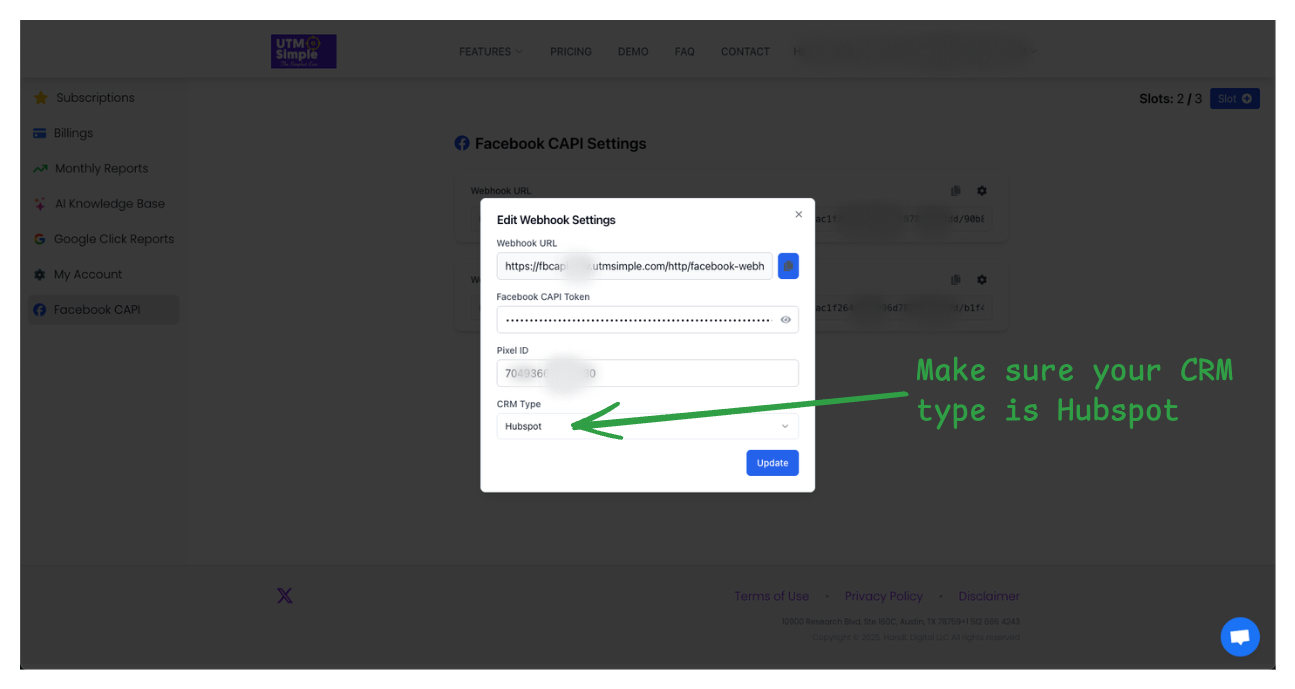
- In your UTMSimple dashboard, enter your:
- Facebook CAPI Access Token
- Facebook Pixel ID (Dataset ID)
- Select HubSpot as your CRM type
- Copy your unique webhook URL - this is what you'll use in HubSpot workflows
Step 2: Configure HubSpot Workflows
Creating a Basic Lead Tracking Workflow
for more details you can check this guide: UTMSimple facebook capi integration
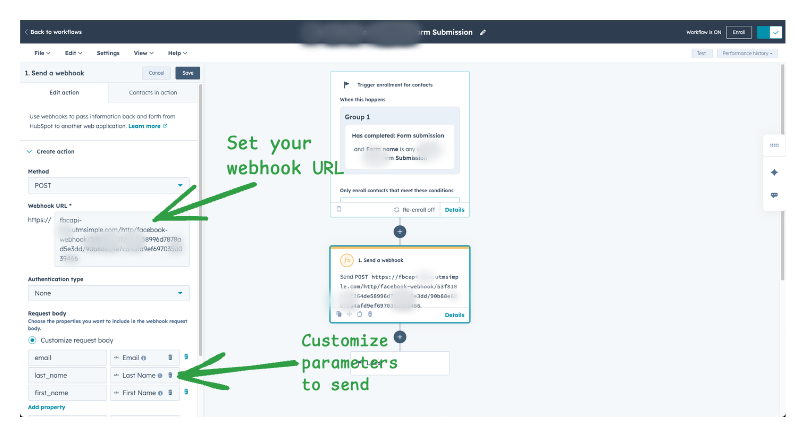
Adding the Webhook Action
- Add an action to your workflow
- Select "Send a webhook" from the list of actions
-
Configure the webhook with these settings:
- Method: POST
- URL: Your UTMSimple webhook URL
- Request body: JSON format (see example below)
Sample Webhook Payload for HubSpot
Here's a recommended JSON structure for your HubSpot webhook:
{
  "format": "custom",
  "event_type": "Lead",
  "email": "{{ contact.email }}",
  "phone": "{{ contact.phone }}",
  "first_name": "{{ contact.firstname }}",
  "last_name": "{{ contact.lastname }}",
  "utm_source": "{{ contact.hs_analytics_source }}",
  "utm_medium": "{{ contact.hs_analytics_medium }}",
  "utm_campaign": "{{ contact.hs_analytics_campaign }}",
  "utm_term": "{{ contact.hs_analytics_term }}",
  "utm_content": "{{ contact.hs_analytics_content }}",
  "value": 0,
  "currency": "USD"
}
Step 3: Advanced Workflow Examples
Lead Qualification Workflow
Track when leads become Marketing Qualified Leads (MQLs):
{
  "format": "custom",
  "event_type": "CompleteRegistration",
  "email": "{{ contact.email }}",
  "phone": "{{ contact.phone }}",
  "utm_source": "{{ contact.hs_analytics_source }}",
  "utm_medium": "{{ contact.hs_analytics_medium }}",
  "utm_campaign": "{{ contact.hs_analytics_campaign }}",
  "value": 25,
  "currency": "USD"
}
Trigger: Contact property "Lifecycle Stage" changes to "Marketing Qualified Lead"
Deal Closed Won Workflow
Track actual revenue when deals close:
{
"format": "custom",
"event_type": "Purchase",
"email": "{{ contact.email }}",
"phone": "{{ contact.phone }}",
"utm_source": "{{ contact.hs_analytics_source }}",
"utm_medium": "{{ contact.hs_analytics_medium }}",
"utm_campaign": "{{ contact.hs_analytics_campaign }}",
"value": "{{ deal.amount }}",
"currency": "{{ deal.dealcurrencycode }}"
}
Trigger: Contact books a meeting through your booking link
Step 4: Testing Your Integration
- Create a test contact in HubSpot that meets your workflow criteria
- Monitor the workflow history to ensure the webhook fires successfully
- Check Facebook Events Manager to verify events are being received
Pro Tips for HubSpot Integration
Use Contact Properties Effectively
- Leverage HubSpot's built-in UTM tracking properties
- Set up custom properties for additional attribution data
- Use calculated properties for dynamic event values
Optimize Your Event Strategy
- Lead: Form submissions, content downloads
- CompleteRegistration: MQL conversion, trial signups
- Purchase: Closed won deals, subscription renewals
- Schedule: Demo bookings, consultation requests
Handle Multiple Touchpoints
Create different workflows for different customer journey stages to build a complete attribution picture in Facebook.
Troubleshooting Common Issues
Webhook not firing: Check that your enrollment criteria are correctly set and the contact meets all conditions.
Events not appearing in Facebook: Verify your Facebook CAPI token and Pixel ID are correctly entered in UTMSimple.
Missing UTM data: Ensure UTM parameters are being captured on your forms and landing pages.
Next Steps
Once your HubSpot workflows are sending events to Facebook CAPI, you can:
- Create custom audiences based on these server-side events
- Optimize your Facebook campaigns for your most valuable actions
- Build lookalike audiences from your highest-value customers
- Set up automated bidding based on actual business outcomes
For additional support or advanced configurations, visit docs.utmsimple.com or reach out to our team at support@utmsimple.com.